


eiligen Eingangssignals ist. Die folgenden Hinweise set-
zendieVerwendungvon8Ohmoder4OhmLautspre-
chern oder Kombinationen mit ähnlichen Leistungswerten
voraus.
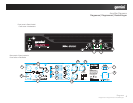
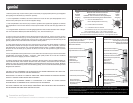
1. With the power off, set the operation mode switch (11)
to the stereo position. When the power is on, the bridge
led (18) on the front panel will not light. If this led illumi-
nates, you have the switch in the wrong position. Correct
before continuing.
1. Con la unidad apagada, seleccionar con el selector de
mododeoperación(11),enposiciónestéreo.Cuandose
haya encendido, el LED de modo puente(18) en el panel
frontalnoseiluminará.SiesteLEDseilumina,ustedtiene
elinterruptorenlaposiciónequivocada.Corrijaantesde
continuar.
1.Avecl’amplicateuréteint(Off),positionnezlecommu-
tateurdemodedefonctionnement(11)surstéréo.Enral-
lumantl’amplicateur(On),laLEDbridge(18)-situéeen
faceavant-doitêtreéteinte.Sicelle-ciresteallumée,vous
avezsélectionnélemauvaismodedefonctionnement.Ré-
pétezl’opérationensélectionnantlemode defonction-
nementadéquatavantdepoursuivre.
1. Im ausgeschalteten Zustand schalten Sie den Betrieb-
smodus (11) auf stereo. Eingeschaltet zeigt die Bridge LED
(18) an, wenn Sie den Schalter in der falschen Position ha-
ben. Korrigieren Sie dies vor dem Fortfahren.
2. With the power off, connect your input cables to the
channel1and2inputsusingeithertheXLRinputjacks(4,
5),1/4”trsinputjacks(6,7)ortheRCAinputjacks(8,9)of
each channel. The other channel 1 and channel 2 inputs can
beusedtolinktoanadditionalamplier.
2. Con la unidad apagada, conecte sus cables de entrada
en los canales de entrada 1 y 2 usando para ambos los
conectores XLR de entrada (4,5), los Jack de entrada TRS
¼” (6,7), o el RCA (8,9) para cada canal. Las otras entradas
del canal 1 y el canal 2 se pueden utilizar para enlazar otro
amplicadoradicional.
2.Avecl’amplicateuréteint(Off),branchezvoscordons
audioauxcanaux1&2enutilisantlesentréesXLR(4,5),
Jack6.35mm(6,7),ouRCA(8,9).Lesentréesnonutilisées
peuventalorsserviràrelierlesentréesdecetamplicateur
àunautreamplicateuralimentéparlemêmesignalaudio
(Chainlink).
2. Im ausgeschalteten Zustand schließen Sie Ihre Sound-
quelleandieXLREingänge(4,5),6,35mmKlinkeneingänge
(6, 7) oder Cincheingänge von Kanal 1 und 2 an. Die übrigen
Eingänge von Kanal 1 und 2 können verwendet werden, um
einenweiterenVerstärkerzuBetreiben.
3. Connect the loudspeakers to the channel 1 and channel
2 speaker outputs (12, 13). The total speaker load must be
at least 4 ohms per channel. If you try to operate at a lower
impedance,theamplierwillgointoprotectionmodeand
stop operation until you correct the load conditions.
3. Conectar los altavoces a las salidas de altavoces del ca-
nal1ycanal2(12,13).Lacargatotaldebesercomomínimo
de 4 ohm por canal. Si trata de operar con una impedancia
másbaja,elamplicadorsecolocaráenmododeprotec-
ciónydejarádefuncionarhastaquecorrijalascondiciones
de carga.
3. Connectez les enceintes aux canaux 1 & 2 via les sor-
tiesenceintes(12,13).L’impédancetotaledesenceintes
nepeutêtreinférieureà4Ohms.Sivoustentez-malgré
tout-uneimpédancemoindre,l’amplicateursemettraau-
tomatiquementenmodeprotection&cesseradefonction-
nerjusqu’àmodicationdel’installation.
3. Schließen Sie die Lautsprecher an die Ausgänge von Ka-
nal 1 und 2 an (12, 13). Die gesamte Lautsprecherlast muss
mindestens4OhmjeKanalbetragen.WennSiedenBetrieb
miteinerniedrigerenImpedanzversuchen,sowirdderVer-
stärker in den Protection-Modus schalten und den Dienst
verweigern, bis Sie die Last korrigieren.
4. With the level controls (21, 22) of both channels set to
zero (fully counterclockwise), turn the power switch (15) on.
With the level controls of your mixer or other input device
turnedallthewaydown,turntheamplierlevelcontrolsup
around3/4(or75%)fordesiredloudnessfromyourspeak-
ers.Note,whentheclipled(19)lights,thereisdistortion
presentintheamplier’soutputsection.Ifaclipled(19)
remainsonorashesrepeatedly,reducethesignallevelby
lowering the input level control for the channel that is clip-
ping or reduce the level at the source.
4.Con los controles de nivel (21,22) de ambos canales a
≤(75% dela potenciadel amplicador),en primerlugar
conectar la mesa de mezclas u otro dispositivo de entrada
yluegoencenderelamplicadorutilizandoelinterruptorde
encendido(15).Después,conloscontrolesdeniveldesu
mesa de mezclas u otro dispositivo de entrada nivelar el
audioandealcanzarlos0decibeliosenlosindicadores
delamesademezclas.Nota,cuandoelLEDdeClip(19)
se enciende, hay una distorsión presente en la salida del
amplicador.SielLEDdeClip(19)sigueencendidoopar-
padea repetidamente, reducir el nivel de la señal mediante
la reducción del nivel de entrada del control por canal o
reducir el nivel de origen.
4.Aveclespotentiomètres(21,22)enposition3/4(75%
de la puissance de l’amplicateur), mettez d’abord vos
sources & console de mixage sous tension et allumez
l’amplicateur(On)àl’aidedel’interrupteurPower(15)en
dernier ressort. Puis avec les potentiomètres de volume
devotreconsoledemixageet/oudevossourcesréglezle
niveauaudiodefaçonàatteindrele0dBsurlesvu-mètres
devotreconsoledemixage.NotezquesilesLEDsdeclip
(19)s’allument,celaindiquelaprésencededistorsionen
sortiedel’amplicateur.SilesLEDsdeclip(19)restentcon-
stammentallumées,réduisezleniveaud’entréedelavoie
oudes2voiessicelaestnécessaireouréduisezlevolume
de la console de mixage ou de la source.
4. Mit den Lautstärkedrehreglern (21, 22) beider Kanäle auf
Nullstellung(vollständiggegenUhrzeigersinn),schaltenSie
denNetzschalter(15)ein.RegelnSiezuerstdieLautstärke
IhrerSoundquellefallsmöglichaufeinnormalesLine-Level
(0dB).DannregelnSiedieLautstärkedesVerstärkerssoweit
nach oben, bis die gewünschte maximale Lautstärke Ihrer
Lautsprecher erreicht ist. Wenn die Clip LED (19) leuchtet
Connections and System Control
ConexionesyControldesistema•Connexions&Utilisation•AnschlüsseundSystemeinstellungen
12