Using the iD50
5
Connecting the Unit to Power Source
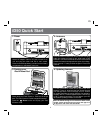
Connect the AC adaptor cable plug into the DC jack on the back of the system, then plug the AC cord of the AC adaptor
into the wall outlet. Adaptor must be plugged in to operate unit. The unit does not operate on battery (a battery back up
system maintains clock settings during power failures).
Updating your iD50 firmware
For best performance, make sure to update the iD50 firmware. To do so, download the free iHome Set app from the App
Store. Launch the app, scroll to “Search for Update”, then follow directions to update the firmware.
Turning the Unit ON or OFF
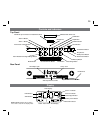
Press the Power/App Button on the unit at any time to turn the unit On or Off. Note that a docked iPad, iPhone or iPod
will continue to charge when the unit is turned off as long as the AC adaptor is plugged in.
Setting the Clock Time Using AutoSync
The AutoSync feature automatically syncs the time setting on the unit to the time on your iPad, iPhone or recent model
iPod (iPod touch, iPod nano and iPod Classic; older iPod models such as iPod mini do not support this feature).
AUTOSYNC SETTING
By default, the unit is set to AUTOSYNC ON mode and will attempt to autosync the time whenever a capable iPad, iPhone
or iPad is docked.
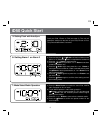
To adjust autosync settings: Press and hold the Clock Button located on the top of the unit for 2 seconds.
“AUTOSYNC ON” flashes on the display and a beep sounds. To turn autosync off, press and release theor Button
while AUTOSYNC ON is flashing until “AUTOSYNC OFF” appears. This will disable autosync and allow you to set
the time manually (see below).
1. Dock your iPad, iPhone or recent model iPod in the unit. In about 3 seconds, the unit will sync to your device.
2. The unit will now autosync every time a capable iPhone/iPod or iPad is docked, and at 2AM each day.
NOTE: iPhone time is automatically updated to the correct time via cell phone towers. The time on your iPad or iPod is
accurate only to the time on the computer the last time the iPad/iPod was synced to it. It’s possible to have up to 59 seconds
difference between the unit and synced iPad/iPhone/iPod.
Setting Time and Calendar Manually
Autosync must be OFF to set the clock manually.
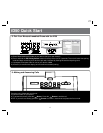
1. Press and hold the Clock Button located on the top of the unit until “AUTOSYNC ON” or “AUTOSYNC OFF” flashes on
the display,(if AUTOSYNC ON appears, press the or Button to toggle to AUTOSYNC OFF setting).
2. Press and release the Clock Button. The time display will flash. Press the or Button to adjust the time (hold for
a few seconds to advance or reverse rapidly). Remember to set the correct AM or PM hour. An icon in the upper left
hand corner of the time display indicates AM or PM.
(Note: if you wish to change the time display from the 12-hour format to the 24-hour format, sometimes called ‘military
time’, press and release either the or Button to switch between 12-hour and 24-hour display formats.)
3. Press the Clock Button again. The year will flash in the lower part of the display. Press the or Button until the
current year is displayed.
4. Press the Clock Button again. The month and date will flash. Press the or Button until the current month and date
is displayed. Hold to advance rapidly.
5. Press the Clock Button once more. Two beeps will sound to confirm your settings and you will exit Time and Calendar
Setting mode.
P8


