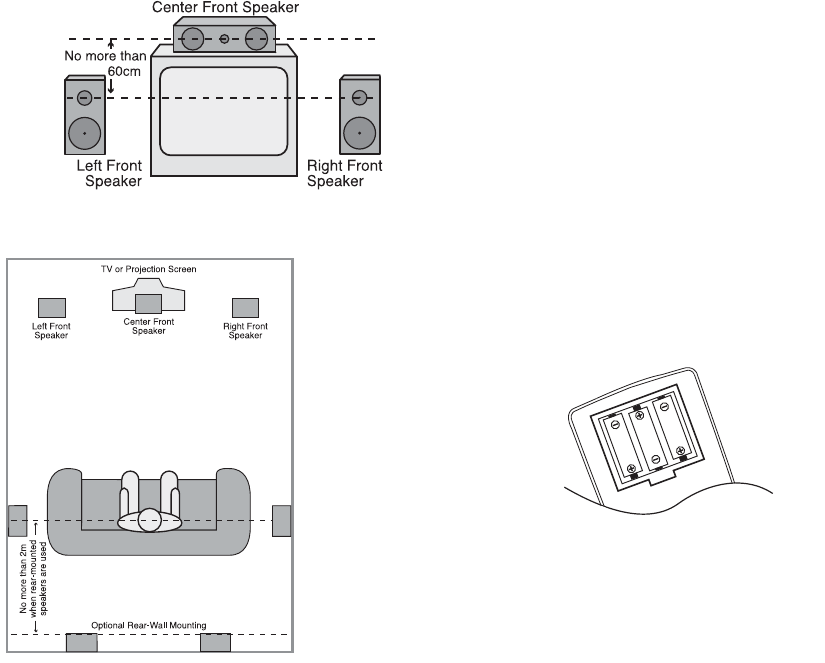
A) Front channel speaker installation with direct-view TV sets or
rear-screen projectors
B) The distance between the left and right speakers should be
equal to the distance from the seating position to the viewing
screen. You may also experiment with placing the left and right
speakers slightly forward of the center speaker. Rear speaker
mounting is an alternate location for 5.1 systems.
Rear surround speakers may also be used in 5.1-channel mode as
an alternative mounting position when it is not practical to place
the main surround speakers at the sides of the room. Speakers may
be placed on a rear wall, behind the listening position. As with the
side speakers, the center of the rear surrounds should face you.
The speakers should be no more than 2 meters behind the rear of
the seating area.
Subwoofers produce largely nondirectional sound, so they may be
placed almost anywhere in a room. Actual placement should be
based on room size. One method of finding the optimal location for
a subwoofer is to begin by placing it in the front of the room, about
15cm from a wall, or near the front corner of the room. Another
method is to temporarily place the subwoofer in the spot where you
will normally sit, and then walk around the room until you find a
spot where the subwoofer sounds best. Place the subwoofer in
that spot.
Connecting the AC Power
NOTES:
• The Power Requirement is: AC 230V, 50Hz.
• Connecting to power other than the one listed above may damage
the system or cause abnormal operation.
• Before connecting the AC power cord of this system to a wall
outlet, connect the speakers and other component cables to the
system.
• Connect the AC power cord of the active subwoofer.
• Connect the AC power cords of your TV and any optional
components to a wall outlet.
Once the speakers have been placed in the room and connected,
the remaining steps are to program the system configuration mem-
ories.
First Turn-On
You are now ready to power up the CS3/CS5 receiver to begin final
adjustments.
1. Plug the Power Cable
4
into an unswitched AC outlet. Note that
the Power Indicator
1
will turn orange, indicating that the unit
is in the Standby mode.
2. Remove the protective plastic film from the main front-panel lens.
If left in place, the film may affect the performance of your
remote control.
3. Install the three supplied AAA batteries in the remote as shown.
Be certain to follow the (+) and (–) polarity indicators that are on
the top of the battery compartment.
4. Turn the CS3/CS5 on either by pressing the Power On/Off
1
or
the Input Source Selectors
0
on the remote control. The
Power Indicator
1
will turn blue to confirm that the unit is on,
and the Main Information Display
0
will also light up.
Basic Playback
Preparation
1. Switch the TV ON and select its video input connected to the CS
receiver.
2. When you switch on the CS system receiver, a JBL welcome
image should appear on the screen. If that screen appears dis-
torted or without color, change the appropriate settings at the
Video Setting submenu according to your TV set and to the con-
nection used between the CS receiver and your TV.
3. If there is no picture at all, not even the JBL screen, check the
setting of the video input used on your TV (most SCART inputs on
TVs can be configured in the TV’s menu). If this doesn’t work,
connect your TV with different cables to the CS receiver, e.g., via
composite (yellow jacks) or S-video cables, rather than SCART to
view the setup menus until all appropriate Video menu settings
are made properly.
4. Press Open/Close
2
7
to open the disc tray.
5. Place a disc on the disc tray.
Hold the disc without touching either of its surfaces, position it
with the side you wish to play facing down, align it with the
guides, and place it in its proper position.
• 3" (8cm) discs or 5" (12cm) discs can be used.
6. After the discs slides into the loader, it will start playing
automatically.
• When the disc tray is closed by pressing Open/Close
2
7
, play
will start automatically.
• With most DVDs, a Disc menu appears on the screen. Select
specific menu item by using Arrow
9
buttons on the remote,
then press Enter
6
.
16
INSTALLATION AND CONNECTIONS


