


14
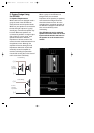
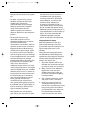
Under-Dash Remote Installation
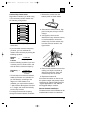
1. Set the GTH400 remote in the
installation location and mark two
mounting screw hole locations.
2. Set the GTH400 remote aside and
drill two pilot holes using a 1⁄16"-
(1mm) bit. Be careful not to drill into
any of the car’s components.
3. Secure the spacer and faceplate
(with the control labeling) to the
front of the remote control panel
using the four smaller screws
included.
4. Push the two adjustment knobs
onto the metal shafts.
5. Set the GTH400 remote back in
place and secure it using two sheet
metal screws. Continue to Step 6 in
the “In-Dash Installation” section.
In-Dash Remote Installation
1. Choose a location for the in-dash
installation and use the template at
the back of this manual to mark
hole locations as shown on the
template.
2. Drill the holes indicated on the
template.
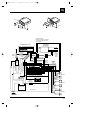
3. Using the diagram on page 15 as
reference, install the remote behind
the panel with the holes just drilled.
Position the remote so the two
knobs feed through panel and the
LEDs are in alignment with the
holes drilled.
4. Place the trim panel with the control
labeling over the two shafts and
secure it in place with the 4 screws
provided.
5. Push the two adjustment knobs
onto the metal shafts.
6. Connect one end of the GTH400
remote control wire (included) to the
connector on the back of the
remote control box.
7. Run the wire back to the GTH400
main chassis and plug the remote
control wire into the “Remote In”
connector on the main chassis.
Note: a standard 6-pin telephone
extension cord may be used if more
wire is needed for remote control
connection. These extension cords
can be purchased at many
electronics or hardware stores.
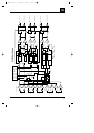
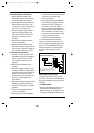
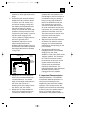
In countries with Right Hand Drive
vehicles, the built-in Image Enhancer
will not operate properly with standard
wiring. To use the GTH400 with right
hand drive vehicles, reverse both the
input and output wiring as shown
below.
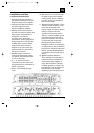
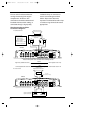
Power Supply Connections
The power input and remote turn-on
wires are connected to the GTH400 via
the power connector on the end of the
amplifier.
+12V Battery Wire
•Connect a wire directly from the +12
volt terminal of the battery to the +
Battery terminal on the amplifier. Use
a minimum of AWG #8. Use wire that
LR LR
– + – +
– + – +
R
+
R
–
L
+
L
–
R
+
R
–
R
+
R
–
L
+
L
–
L
+
L
–
– + – +
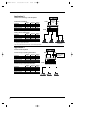
GTH400
RL RL RL
Front SpeakersRear Speakers
Subwoofers
RL
R
Group 1
Group 2
L
Front
Rear
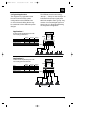
GTH400 Audio Signal Connection
for Right Hand Drive Cars
The right and left inputs and outputs of the GTH400
must be reversed for proper functioning of the virtual
center image enhancer when used in a right hand
drive automobile.
GR 2 GR 1
GR 3 GR 2 GR 1
GTH400-20107 06/03/98 15:49 Side 14