


18
background noise levels in the system
low.
•To adjust a system using a single
GTH400, start with all three of the
amplifier gain controls fully
counterclockwise and the Imaging
Enhancer Remote set to “Bypass”
mode. Some head units have
additional output level controls or
switches. Set those to their maximum
position.
•Set the level controls on any
associated equipment such as
equalizers and electronic crossovers
as recommended by their
manufacturers. Set all Bass/ Treble or
equalizer controls to their centered or
bypassed positions. While listening
carefully to the system output, adjust
the volume control of the radio/tape
deck to the point where you first begin
to hear audible distortion. Use caution:
excessive distortion can damage
loudspeakers. Reduce the level just to
the point where the distortion goes
away. This is the maximum
undistorted output level of your head
unit and signal processors, and should
not be exceeded during use. If audible
distortion does not occur, continue to
increase the level until the head unit is
turned all the way up. If this setting
does not provide adequate volume
levels, gradually increase (turn
clockwise) the gain control for the
main (usually front) speaker groups on
the GTH400 until the system plays as
loud as necessary or when the first
signs of distortion are heard.
•After adjusting the main speaker’s
gain control, you may then turn down
the head unit’s volume control to a
comfortable level, and adjust the
remaining channels for the desired
system balance. You will find this
easiest to do by adjusting the
channels in the following order: 1)
front speaker Group, 2) rear speaker
Group, 3) subwoofer speaker Group.
Elaborate systems incorporating tri- or
quad-amplification can be complex to
adjust. Your local authorized JBL
installation specialist is the best
person to help with such adjustment.
Imaging Enhancer Setup
After the installation and set up is
finished and all wiring is checked,
proceed with the next few steps to set
up the Imaging Enhancer on the
GTH400.
Note: Since the Imaging Enhancer in
the GTH400 is primarily designed to
optimize the sound stage for the driver,
all tests should be performed while
sitting in the driver’s seat.
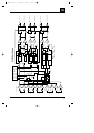
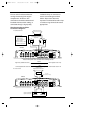
1. The Power Indicator LED on the
GTH400 main chassis should light
up when the head unit is turned on.
2. Make sure the “Front-Ambience/
Bypass/On” knob and “Rear-
Ambience/Driver/All” knobs are
pushed in and rotated completely
counterclockwise.
3. Play a selection which has vocals
and good “center” information.
4. Gently turn up the volume to a
comfortable listening level. You
should hear a very distinctive center
image coming from the middle of
your dashboard. If not, make sure
the “Rear-Ambience/Driver/All”
knob is pushed in to the “Driver”
GTH400-20107 06/03/98 15:49 Side 18