


SD1513
4
BEEP ON/OFF
The beep tone feature allows the selection of
an audible beep tone to be heard each time a
button is pressed on the face of the radio. Turn
the AUDIO CONTROL to select from the
following Beep Tone options:
• BEEP ON: Beep is heard any time a
button is pressed (function activated).
• BEEP OFF: Beep is not heard.
iX-BASS
Press the iXBASS button (15) to activate the
iXBASS feature. When listening to music at low
volume levels, this feature will boost the bass
and treble ranges to compensate for the
characteristics of human hearing. Press
iXBASS again to deactivate this feature.
Subwoofer
Press the SUB-W button (18) to activate the
Subwoofer function. Press again to turn the
Subwoofer function off.
NOTE: The Subwoofer feature only works
when an external amplifier and subwoofer
are connected via the Sub line out
connection on the back of the unit.
Audio Mute (MUTE)
Press the MUTE button (6) to mute the audio
volume. “MUTE” flashes on the display. Restore
volume to the previous setting by pressing the
mute button again, adjusting the AUDIO
CONTROL.
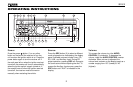
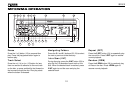
Liquid Crystal Display (LCD)
The liquid crystal display (LCD) panel (8)
displays the frequency, time and activated
functions of the unit.
NOTE: After being subjected to cold
temperatures, LCD panels may take longer
to respond and visibility of the numbers on
the LCD may decrease slightly. The LCD
display will return to normal when the
temperature increases to a normal range.
Display (DISP)
When the unit is on, the LCD automatically
shows the display for the current source of
operation.
When the unit is on, press the DISP button (9)
to display the time of day. After five seconds,
the display reverts to the current source.
Auxiliary Input
Lift the cover on the right side of the radio to
reveal the AUX IN connector (16). Use the
included 3.5mm media cable to connect a
portable media device for playback through the
vehicle sound system.
Front Panel Release
The front panel REL (release) button (10)
releases the mechanism that holds the front
panel to the chassis.
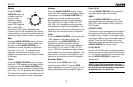
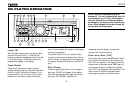
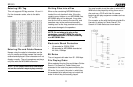
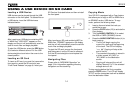
Detaching the Front Panel
To detach the front panel, first press the REL
button (10) to release the left side of the panel.
Next, grasp the released side and pull the panel
off the chassis. After removing the front panel,
store it in the supplied carrying case to protect it
from dirt and damage.
Re-attaching the Front Panel
To re-attach the front panel, make sure the
electrical terminals on the back of the panel are
free of dust and dirt, as debris could cause
intermittent operation or other malfunctions.
Position the right side of the panel in place so
that it is correctly engaged, and then lightly
2
1
REMOVE FRONT PANEL