


Continued on Next Page
SLPK-CAN-SPYDER1_INSTR_SKU# 011312
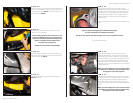
S T E P 7
Looking down from the top front of the storage
compartment, notice where the wire loom enters the
compartment.
S T E P 6
The harness for power, ground, remote turn on, signal and
speakers will come down the right side of the motorcycle
and enter the storage compartment in the upper right rear
corner as shown below.
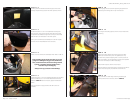
S T E P 5
Remove the front Air dam.
S T E P 4
Remove the air duct body panels as indicated by the image
at left. (One on each side of the motorcycle). There may be
auxiliary lights installed in this panel, unplug them as the
panel is removed.
If you are
ONLY installing the pods and NOT the full
system, but will be installing an amplifier in the front storage
compartment, only remove the air duct body panel on
the right hand side (where the harness enters the storage
compartment (as seen in
STEP 5 below), skip to STEP 6.
Page 2 • JL Audio, Inc 2009
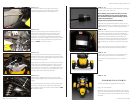
S T E P 9
If you are
ONLY installing the pods and NOT the full system,
skip to STEP 16.
The two templates shown can be found on the last two
pages of the install manual, cut them out and position them
as shown.
Remove the panel directly above the storage compartment
as indicated by the arrow.
S T E P 1 1
Mount the bevelled hole trims as shown using the 8
supplied #6-1 x 3/4” Phillips head screws (4 per trim).
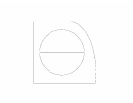
S T E P 1 0
Mark the center positions of each template and cut the two
holes, the holes should be 3-5/8” in diameter after they are
cut.
USE ALL PRECAUTIONS WHEN CUTTING/DRILLING!
S T E P 8
Looking up from the front right tire, use a 1-1/8” hole- saw
to cut a hole for the harness to come through as seen in
STEP 7.
Before drilling, always make sure that you are not
going to be drilling into any gas lines, brake lines,
tires, transmission lines, electrical wiring, exhaust
systems or anything else that might cause a
reduction in your weekly pay.
Always wear eye protection when drilling!