


4
*
3
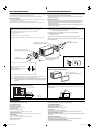
Firmly attach the ground lead to the metallic body or to the chassis of the
car—to the place uncoated with paint (if coated with paint, remove the
paint before attaching the lead). Failure to do so may cause damage to the
unit.
*
3
Pasangkan dengan kuat kabel tanah ke bodi besi atau ke casis dari
mobil—pada tempat yang tidak dilapisi cat (jika dilapisi cat, hilangkan
cat sebelum memasang kabel). Kegagalan melakukan ini mungkin
menyebabkan kerusakan pada unit tersebut.
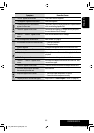
A
Anda dapat menyambungkan penguat untuk meningkatkan sistem stereo mobil anda.
• Anda dapat mengalirkan daya listrik ke amplifier dengan menghubungkan kabel penyambung
(warna biru dengan strip putih) unit ini ke amplifier. (Untuk menghubungkan peralatan lain dengan
menggunakan kabel penyambung, konektor Y harus dibeli secara terpisah.)
• Putuskan sambungan speaker-speaker dari unit ini, sambungkan ini ke penguat. Biarkan ujung
speaker dari unit ini tidak digunakan.
• Anda dapat mematikan amplifier built-in dan mengirimkan sinyal audio hanya ke amplifier
eksternal untuk mendapatkan suara yang bersih dan mencegah penimbunan panas di bagian
dalam unit. Lihat BUKU PETUNJUK di halaman 49.
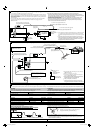
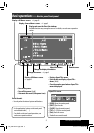
Connecting an external amplifier / Penyambungan penguat eksternal
Connections for external component playback / Koneksi untuk pemutaran komponen eksternal
B
To reverse lamp
Ke lampu mundur
Audio/video cord (not supplied)
Kabel audio/video (tidak disediakan)
To car battery
Ke baterai
Crimp connector (not supplied)*
5
Konektor kerut (tidak disediakan)*
5
Reverse lamp lead*
4
Ujung lampu mundur*
4
Video cord (not
supplied)
Kabel video (tidak
disediakan)
*
4
Required only when connecting a rear view camera to
VIDEO IN terminal.
*
5
Refer to å in diagram Å on page 3.
*
6
Set “AV Input” setting to “Camera” when using (see
page 47 of the INSTRUCTIONS).
*
4
Hanya diperlukan apabila menghubungkan kamera
tampilan belakang ke terminal VIDEO IN.
*
5
Lihat å di diagram Å di halaman 3.
*
6
Tetapkan pengaturan “AV Input” ke “Camera” bila
menggunakan (lihat BUKU PETUNJUK di halaman 47).
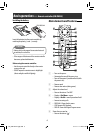
Rear speakers
Speaker-speaker
belakang
Remote lead (Blue with white stripe)
Ujung jauh (Biru dengan strip putih)
Remote lead
Ujung jauh
JVC Amplifier
Penguat JVC
You can connect an amplifier to upgrade your car stereo system.
• You can supply the power to the amplifier by connecting the remote leads (blue with white stripe) of
this unit to the amplifier. (To connect other equipment using the remote leads, Y-connectors need to
be separately purchased.)
• Disconnect the speakers from the unit, and connect them to the amplifier. Leave the speaker leads of
the unit unused.
• You can switch off the built-in amplifier and send the audio signals only to the external amplifier
to get clear sound and to prevent internal heat built-up inside the unit. See page 49 of the
INSTRUCTIONS.
Front speakers
Speaker-speaker
depan
Y-connector (not supplied for this unit)
Konektor Y (tidak disediakan untuk unit ini)
To the remote lead of other equipment
Ke ujung jauh dari peralatan lain
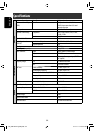
Bila menghubungkan komponen eksternal, rujuk juga buku petunjuk yang dibekalkan untuk komponen dan adaptor.
Peringatan:
Sebelum menyambungkan komponen eksternal, pastikan bahwa unit sudah dimatikan.
Anda dapat menghubungkan komponen JVC berikut ini ke jack CD changer.
Komponen JVC Nama model
CD changer (CD-CH) CH-X1500, dsb.
Anda juga dapat menghubungkan komponen berikut ini melalui berbagai adaptor JVC.
• Kabel koneksi mungkin harus dibeli secara terpisah.
Komponen Adaptor Nama model
Perangkat Bluetooth Adaptor Bluetooth KS-BTA200
iPod Adaptor interface untuk iPod KS-PD100
Audio player portabel dengan jack line output Adaptor line input KS-U57
Audio player portabel dengan jack stereo mini 3,5 mm
Adaptor AUX input KS-U58
Bila menghubungkan beberapa komponen (maksimum: dua), dianjurkan agar anda menghubungkan
komponen dalam rangkaian seperti dijelaskan di bawah.
Connections to the CD changer jack / Koneksi ke jack CD changer
When connecting the external components, refer also to the manuals supplied for the components and adapter.
CAUTION:
Before connecting the external components, make sure that the unit is turned off.
You can connect the following JVC components to the CD changer jack.
JVC component Model name
CD changer (CD-CH) CH-X1500, etc.
You can also connect the following components through the various JVC adapters.
• Connection cords may need to be purchased separately.
Component Adapter Model name
Bluetooth device Bluetooth adapter KS-BTA200
iPod Interface adapter for iPod KS-PD100
Portable audio player with line output jacks Line input adapter KS-U57
Portable audio player with 3.5 mm stereo mini jack AUX input adapter KS-U58
When connecting more than one component (maximum: two), it is recommended that you connect the
components in series as explained below.
CD changer jack / Konector CD changer
When connecting two components in series /
Bila menghubungkan dua komponen dalam rangkaian
To disconnect the connector / Untuk memutuskan konektor
Hold the connector top tightly (
1 ), then pull it out ( 2 ).
Pegang erat konektor (
1 ) lalu tarik keluar ( 2 ).
iPod adalah merek dagang dari Apple Inc., terdaftar di Amerika Serikat dan di negara-negara lain.
C
iPod is a trademark of Apple Inc., registered in the U.S. and other countries.
*
7
To use these components, set the external input setting correctly (see page 47 of the
INSTRUCTIONS).
*
7
Untuk menggunakan komponen ini, lakukan pengaturan masukan eksternal yang benar (lihat
halaman 47 dari BUKU PETUNJUK).
A KS-BTA200
B*
7
CD-CH / KS-PD100 / KS-U57 / KS-U58
Reverse lamp
Lampu mundur
Camcorder, Navigation System, etc.
Camcorder, Navigation System, dsb..
Rear view camera KV-CM1*
6
Kamera tampak belakang KV-CM1*
6
External monitor
Monitor eksternal
AV amplifier or decoder
Amplifier AV atau decoder
Digital optical cable (not supplied)
Kabel optik digital (tidak disediakan)
Extension lead (not supplied)
Kabel sambungan (tidak disertakan)
AVX710[UN]_install.indb 4AVX710[UN]_install.indb 4 07.12.24 11:30:40 AM07.12.24 11:30:40 AM