


C2927M (01/06) 9
5.
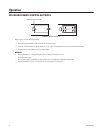
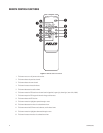
DVI IN:
This can be connected to the DVI cable (supplied).
6.
USB:
This is the USB-A 2.0 downstream port. It can be used to connect to such peripherals as a USB camera or USB key.
7.
USB:
This is the USB-A 2.0 downstream dual port. It can be used to connect to such peripherals as a USB camera or USB key.
8.
USB:
This is the USB-B 2.0 upstream port. It can be used to connect to a PC using the USB cable (supplied).
9.
S-VIDEO IN:
This connection can bring in an S-video signal by DIN socket.
10.
S-VIDEO OUT:
This connection can output an S-video signal by DIN socket. This socket is the loop-through output (maximum of one
looping operation only is recommended).
11.
AUDIO IN:
These RCA sockets can be connected to audio outputs (White terminal, Reed terminal).
12.
AUDIO OUT:
These RCA sockets can output sound to other speakers. This socket is the loop-through output.
13.
VIDEO 1 IN/OUT:
The IN BNC socket can be connected to a composite video output. The OUT BNC socket is the loop-through output.
The input is automatically terminated if the loop-through output is not used.
14.
VIDEO 2 IN/OUT:
The IN BNC socket can be connected to a composite video output. The OUT BNC socket is the loop-through output.
The input is automatically terminated if the loop-through output is not used.
15.
Speakers:
The unit has two built-in speakers.
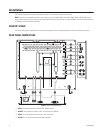
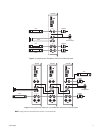
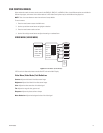
VIDEO AND POWER CONNECTIONS
Refer to Figure 2 for video, audio, power, and other connections.
1. Connect the video cable. (Refer to Table A for video coaxial requirements.)
a. Connect video cables as follows, depending on the input source.
•
For composite, connect to the BNC video input labeled VIDEO 1 IN on the back panel of the monitor. If the installation requires a
second video input, connect a video cable to the BNC video input labeled VIDEO 2 IN. (Inputs are auto-terminating. If the corre-
lating output is not used, the input will be terminated.)
•
For S-Video, connect to the input labeled S-VIDEO IN on the back panel of the monitor. (Inputs are auto-terminating. If the corre-
lating output is not used, the input will be terminated.)
•
For VGA, connect to the input labeled VGA IN on the back panel of the monitor.
•
For DVI, connect to the input labeled DVI IN on the back panel of the monitor.