12
5.2 Opening the housing
WARNING: Before attempting to open
the housing, the mains lead and the 48 V
DC battery plug should be disconnected.
It is not sufficient to merely switch off the
ON/OFF switch on the front panel.
Access to the inside of the Control Centre is
gained by removing the cover. This is done
by removing the four ‘cross-head’ screws
located in the sides of the unit. The cover is
then simply lifted off the housing. When the
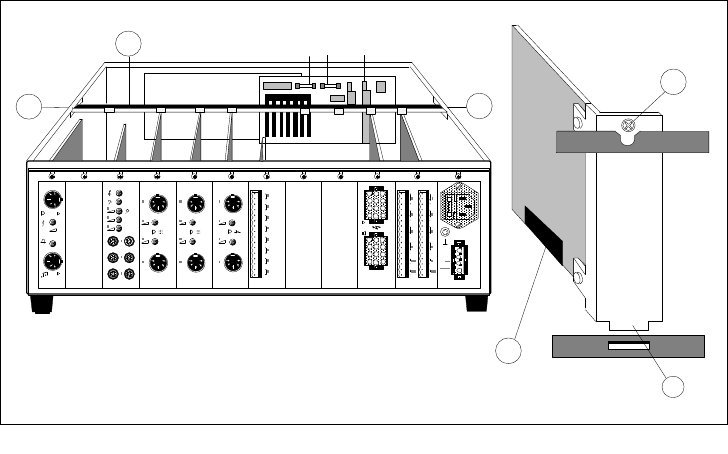
cover is removed, a ‘retaining bar’ (fig.5.2A)
will be seen spanning the top of the housing.
This should now be removed by loosening
(not removing) the screws located in its
ends.
To access the screw heads, the screwdriver
must be inserted through the holes in the
sides of the housing (fig.5.2B). With the
screws loosened a little, the bar can be slid
vertically out of the screw slots.
Removing Module Blank Panels
The module blank panels are removed in a
similar way, by loosening the cross-head
screws a little and sliding the panels
vertically out of their keyhole slots.
Mounting the Modules
Before inserting the modules, read their
respective chapters to make sure that there
are no jumpers that need to be set in order
to carry out the desired function(s). The
modules are located, as illustrated in fig.5.1,
by aligning the front plate screw with the
keyhole slot (fig.5.2C); the key at the
bottom of the front plate (fig.5.2D) with the
slot in the bottom of the housing; and the
multi connector (fig.5.2E) with the socket
mounted on the mother board. The module
is then gently pushed into place by putting
pressure on the top of the circuit board. If it
does not slot easily into place do not
attempt to force it. Check that it is properly
aligned and try again. When the modules
are inserted, and properly seated in their
connectors, tighten their front plate screws.
Fig. 5.2 - Top view
FUSE 1- 2
X3
LBB 1286
LBB 1284
LBB 1287 LBB 1288
LBB 1282LBB 1283 LBB 1282
B
A
B
E
C
D
GB/SM 30 user manual 5/26/98 10:18 AM Page 12


