


15
More Info @ www.polkaudio.com/car
14
MM: Designed To Perform
DEUTSCH
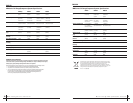
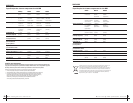
Abbildung12
BündigerEinbau
HOCHTÖNER-MONTAGE
1.PrüfenSie, obgenugFreiraum daist.Der Kitzur
bündigenInstallationist 22,2mmtief.
2.MarkierenSie denMittelpunktdes gewünschten
Lochsundschneiden Siemiteiner Lochsäge,einem
Bohrerodereinem TeppichmessereinLoch mit
50,8mmDurchmesser.
Hinweis:DerBecher unddieFederhalteklammer
werdenalseine vorinstallierteEinheitausgeliefert.
3.FührenSie dieKabeldurch denAusschnittund
dierundeÖffnung untenamBecher.
4.DrückenSie dieBecher/Federhalteklammerbaugruppe
indenAusschnitt, bisdieArme derFederklammereinrasten.
5.VerbindenSie dieDrähtevon denHochtöneranschlüssen
amCrossovermit demHochtönerselbst unterVerwendung
derFaston-Anschlüsse.Verbinden Siedenroten Drahtvom
p
ositiven(+)Anschluss desCrossover-Hochtönerausgangs
m
itdemroten positiven(+)Draht vomHochtöner.
Hinweis:Wenndie Hochtönerleitungennichtlang genug
sind,verwendenSie diebeiliegendenVerlängerungen.
6
.BefestigenSie denHochtöner,indem Sieihnin den
bündigenMontagebechereinrasten lassen.
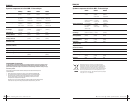
Figura12
Montagemembutida
INSTALAÇÃODOTWEETER
1.Verificarse háfolgaadequada Okitpara montagem
embutidatemuma profundidadede7/8" (22,2mm).
2.Marcaro centrodoorifício aserperfurado e,em
seguida,cortarum círculode2" (50,8mm)dediâmetro
usandoumaserra copo,brocaou estilete.
Observação:Ocopo eogrampo demolavêm pré-mont
adoscomouma peçasó.
3.Passeos fiospelocorte e,depois,pela abertura
circularnofundo docopo.
4.Pressioneo conjuntocopo/grampoembutido nocorte
atéouviro cliquedogrampo demolaencaixando-se
nolugar.
5.Conecteos fiosdosterminais dotweeterpara o
cruzamentocomo própriotweeterusando conectores
dotipofast-on. Conecteofio vermelhodoterminal
positivo(+)da saídacruzadado tweeteraofio
vermelhopositivo(+) dotweeter.
Observação:Useos fiosdeextensão inclusoscasoos
fiosdotweeter nãosejamsuficientemente longos.
6.Monteo tweeterencaixando-ono copodemontagem
embutida.
Figura12
Montaggioafilo
FISSAGGIODELTWEETER
1.Verificareche sipossaassicurare lospaziogiusto:
ilkitdi montaggioafilo haunaprofondità di22,2mm.
2.Contrassegnareil centrodelpunto diinstallazione
epraticareun forodidiametro paria50,8 mm(2”)
medianteunasega atazza,una puntaditrapano
ounrasoio.
Nota:lacassa elastaffa elasticasonopre-montate
comeunitàsingola.
3.Infilarei cavinelforo praticatoequindi nell’apertura
circolaresullaparte inferioredellacassa.
4.Spingereil gruppocassa/staffaelastica nelforo
finchéibracci dellastaffanon sibloccanocon
unoscatto.
5.Collegarei cavidaiterminali delcrossoveral tweeter
medianteiconnettori Faston,collegandoil cavorosso
dalterminalepositivo (+)dell’appositauscita del
crossoveralcavo rossopositivo(+) deltweeter.
Nota:adoperarei cavidiprolunga acclusisei cavi
deltweeternon sonodilunghezza sufficiente.
6. Inserire iltweetera filonellacassa accertandosi
chesiblocchi conunoscatto.
PORTUGUES
ITALIANO
MM6501 & MM5251
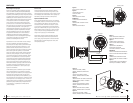
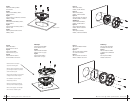
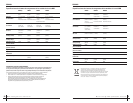
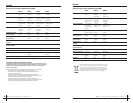
Figure12
FlushMount
TWEETERMOUNTING
1.Checkfor properclearance:The flushmount
kitis7/8" (22.2mm)deep.
2.Markthe centerofthe holeyouwant tocut.
Thencuta 2"(50.8mm)diameter holeusing
aholesaw, drillbitor razorknife.
Note:Thecup andspringclamp comepre-
assembledasa singleunit.
3.Routewires throughthecutout andthenthrough
theroundopening inthebottom ofthecup.
4.Pressthe flushcup/springclamp assemblyinto
thecutoutuntil thespringclamp arm'ssnap
intoplace.
5.Connectwires fromthetweeter terminalsfor
thecrossoverto thetweeteritself usingthe
fastonconnectors.Connect theredwire from
the(+)positive terminalofthe crossovertweeter
outputtothe redpositive(+) wirefromthe tweeter.
Note:Usethe includedextensionwires ifthe
tweeterleadsaren't longenough.
6.Mountthe tweeterbysnapping itintothe flush
mountcup.
Figura12
Montajealras
MONTAJEDELTWEETER
1.Verifiqueque hayasuficienteespacio. Eljuego
demontajeal rastiene22.2 mm(7/8de plg.)
deprofundidad.
2.Marqueel puntocentraldel áreadondeva aquedar
elcortey luegohagaun agujerode50.8 mm(2plg.)
conunasierra caladora,unabroca perforadoraoun
cuchilloutilitario.
Nota:Lacopa ylaabrazadera deresortevienen
armadasdeantemano comounidad.
3.Encaminelos cablesporel corteyluego através
delaabertura redondaquehay enlabase delacopa.
4. Presionelacopa conabrazaderasobre elcortehasta
quelapata delaabrazadera encajeenposición.
5.Conectecables desdelasterminales detweeterdel
crossoverhastael propiotweetercon conectoresFaston.
Conecteelcable rojodela terminal(+)de lasalidade
tweeterdelcrossover alcablerojo (+)deltweeter.
Nota:Uselos cablesdeextensión quesesuministran
siloscables deltweeterno sonsuficientementelargos.
6. Monteeltweeter haciéndoloencajara presiónenla
copademontaje.
ESPANOL
FRANÇAIS
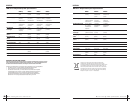
Figure12
Montageensurface
MONTAGEDUTWEETER
1.Assurezun dégagementsuffisant.
Lekitde montageensurface requiertun
dégagementde22,2 mm(7/8")de profondeur.
2.Marquezle centredutrou quevousdésirez
faire.Faitesensuite untroude 50,8mm(2")
àl’aided’une scie-cloche,d’unforet oud’un
outilcouteau.
Note:Lacoupelle etlecrampon-ressort sont
préassembléespourformer uneseulepièce.
3.Passezles filsparle troupuisà traversl’ouverture
rondeàla basedela coupelle.
4.Poussezl’ensemble coupelle/crampondansle trou
jusqu’àceque lespattesdu crampon-ressorts’enclenchent.
5.Raccordezles filsdesbornes desortie« tweeter»du
séparateurauxbornes dutweeterà l’aidedesconnecteurs
fast-on.Connectezle filrougede labornepositive (+)dela
sortietweeterdu séparateuràla bornerouge(+) dutweeter.
Note:Utilisezles filsd’extensionfournis silesfils du
tweeternesont pasassezlongs.
6.Montezle tweeterenl’encliquetant danslacoupelle.
ENGLISH
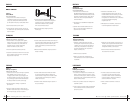
springclip
crampon-ressort
abrazaderaderesorte
federklemme
grampodemola
staffaelastica