12
MENU OPERATION
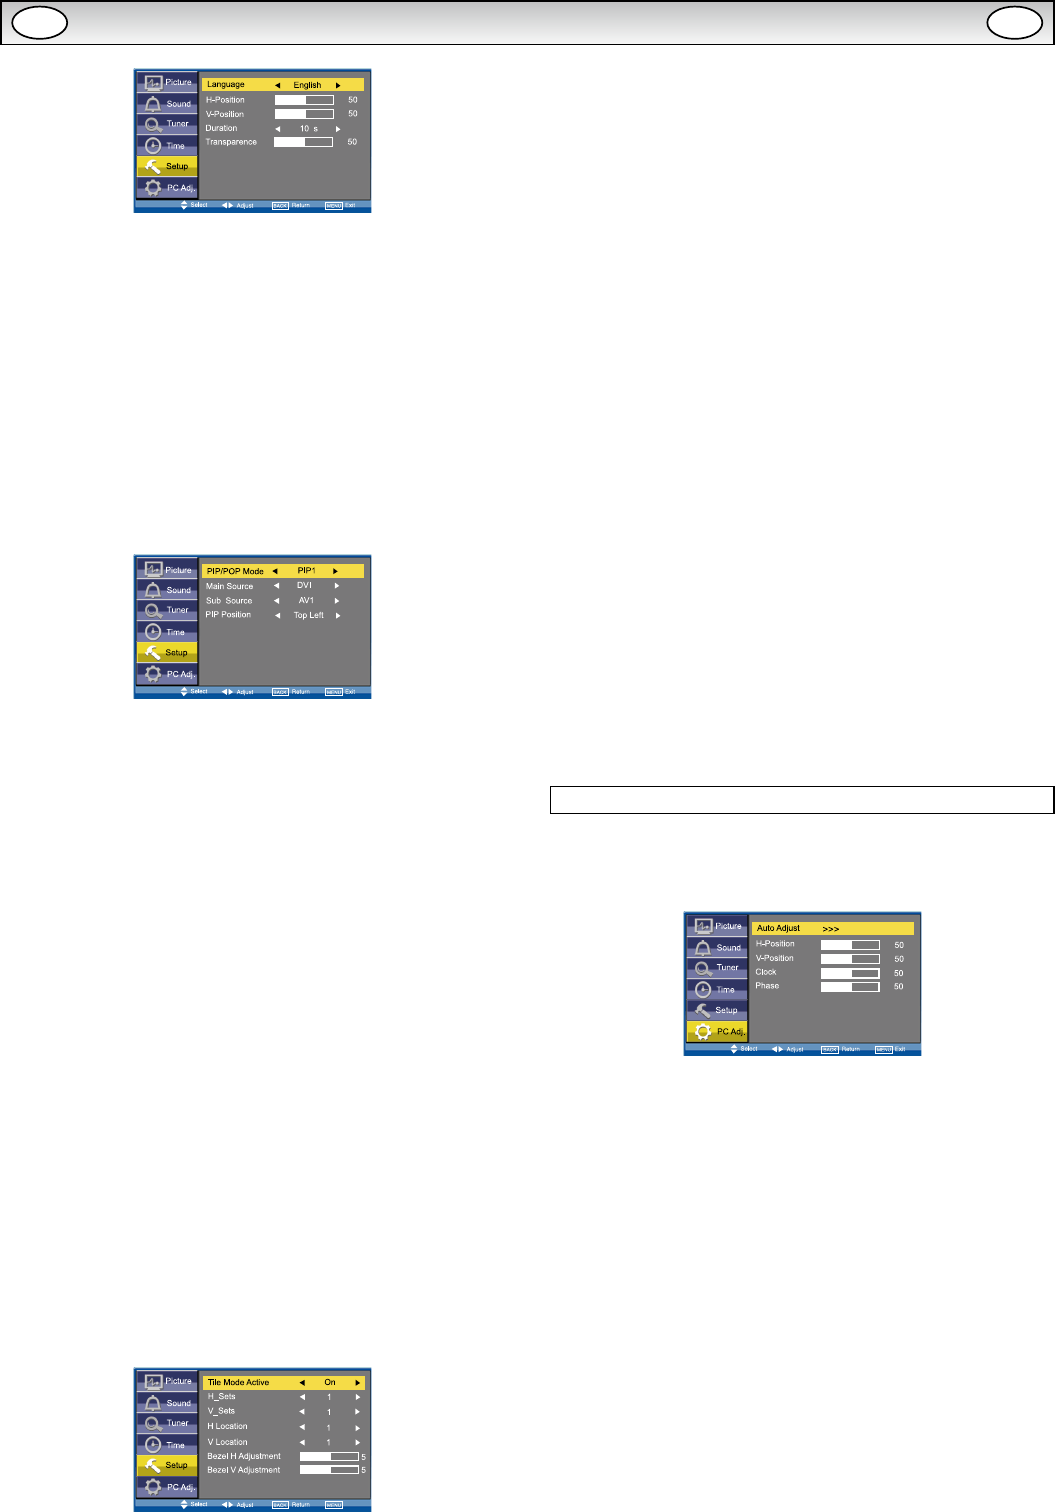
Language is used to select the preferred language. Use the 1 or
2 button to select English, French, German, Italian, Spanish or
Dutch.
H-Position changes the OSD position horizontally by using the 1
or 2 button.
V-Position changes the OSD position vertically by using the 1 or
2 button.
Duration is used to set the display time of the MENU by using the
1 or 2 button. (5 ~ 120 seconds)
Transparence is used to adjust transparence of menu display. Use
the 1 or 2 button to adjust levels.
■ PIP/POP Setup
Use the 5 or 6 button to select PIP/POP Setup and press the
1 or 2 button to enter the sub menu.
PIP/POP Mode: Using the 1 or 2 button select the most suit-
able mode PIP1, PIP2, POP or Off. (Please refer to page 15.)
✐ When Mode is set to Off, Sub Source and PIP Position will not
work.
Main Source is used to select input source (AV1, RGB, AV2, AV3, PC,
DVI or Network ) for main picture by using the 1 or 2 button.
Sub Source is used to select input source (AV1, AV2, AV3, PC or
DVI) for sub picture by using the 1 or 2 button.
✐ For a combination of main picture and sub picture: only DVI or
Network input can assemble with other input source. For example,
if main source is selected as AV1 input, then the sub source must
be DVI or Network input.
PIP Position: Using the 1 or 2 button it can be selected Top
Left, Top Right, Bottom Right or Bottom Left.
■ Initial Settings
This function returns all setting values except for Installation Mode.
■ Text Language
Use the 5 or 6 button to select Text Language and press the
1 or 2 button to select Western, Eastern, Russian, Arabic or
Farsi.
■ Tile Mode
This function allows you to split an image to suit your monitor grid
format to create a video wall.
Use the 5 or 6 button to select Tile Mode and press the 1 or
2 button to enter the sub menu as follows.
Tile Mode Active can be set On or Off using the 1 or 2 but-
ton.
H_Sets is used to divide the horizonal picture into more than one
part, but the most is 5 parts (5 monitors).
V_Sets is used to divide the vertical picture into more than one part,
and the most is also 5 parts (5 monitors). Using the 1 or 2 but-
ton to set.
H Location is used to select one part of the horizonal picture to dis-
play on the current LCD Monitor using the 1 or 2 button.
V Location is used to select one part of the vertical picture to display
on the current LCD Monitor using the 1 or 2 button.
Bezel H Adjustment is used to align the image horizontally with
respect to the other monitors in the video wall to accommodate the
bezel width using the 1 or 2 button. (0 ~ 10)
Bezel V Adjustment is used to align the image vertically with respect
to the other monitors in the video wall to accommodate the bezel
width using the 1 or 2 button. (0 ~ 10)
■ AV2 Setting
Use the 5 or 6 button to select AV2 Setting and press the 1
or 2 button to select YPbPr or RGBHV.
Connect your PC to either PC-IN or RGBHV on the rear of the set.
Once connected select PC mode or AV2 (RGBHV, see page 8 for AV2
input settings) via the INPUT button on your remote control.
The set will become a monitor for the PC.
■ XGA Mode
Use the 5 or 6 button to select XGA Mode and press the 1 or
2 button to select XGA or WXGA 1366 x 768.
■ PC Power Save
The monitor set automatically turns off with no PC input signal and
wakes up with signal while PC Power Save is active.
Use the 5 or 6 button to select PC Power Save and press the
1 or 2 button to select ON or OFF.
PC Adj. menu
Press the MENU button and select PC Adj. using the 5 or 6
buttons, press the 1 or 2 button to enter. Press the BACK
button to return to the previous menu. Press the MENU button to
exit menu operation.
Auto Adjust is used to automatically detect incoming signal, and
adjust itself to optimize its performance by using the 1 or 2
button. If the image is not displayed properly, a manual adjustment is
required (Refer to following adjustments).
H-Position is used to move the horizontal picture position by using
the 1 or 2 button.
V-Position is used to move the vertical picture position by using the
1 or 2 button.
Clock is used to eliminate icker from the image by using the 1 or
2 button.
Phase is used to eliminate disorder from the image by using the 1
or 2 button.
GB GB
