


7
E
Remote Control Mode
With the remote control unit it’s possible to perform operation
of...
• The primary monitor
• Monitors with a specied ID No.
• All primary/secondary monitors
It’s necessary to specify which type of operation will be
performed in advance.
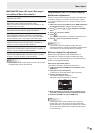
1. If using the remote control unit, press
MODE
for approx 5
seconds.
If using the monitor buttons, hold both
and at
the same time on the primary.
▲
▲
THIS MONITOR ONLY
REMOTE CONTROL MODE
MODE
OK CANCEL
Operate this monitor.
2. Press
or
, select the mode, then perform
settings.
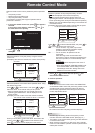
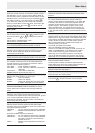
THIS MONITOR ONLY
Performs operation of only the primary using the remote
control unit.
[Example] If the volume is lowered, the volume of the primary
will lower.
Secondary
ID No.: 2
Secondary
ID No.: 3
Primary
ID No.: 1
Secondary
ID No.: 4
VOLUME 10
Press to lower the volume
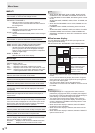
SPECIFIED MONITOR
Performs operation of a monitor with a specied ID No. using
the remote control unit.
Press
or to select ID No., then press or to
select the ID No. of the monitor that you will operate.
* When it receives signals from the remote control unit,
“Operating specied monitor.” will be displayed on the
primary screen.
[Example.] If ID No. is set to 3 and the volume is lowered,
the volume of the monitor for ID No.: 3 will lower.
Secondary
ID No.: 2
Secondary
ID No.: 3
Primary
ID No.: 1
Secondary
ID No.: 4
VOLUME 10
Press to lower the volume
When you would like to conrm the ID No. that is set to the
monitor, press
or to select ID No. DISPLAY, then
press
. The ID No. will be displayed on the screen.
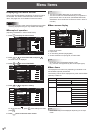
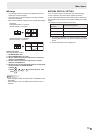
ALL MONITORS
Performs operation of all primary/secondary monitors.
*
ALL
will be displayed on the menu of the primary.
* When it receives signals from the remote control unit,
“Operating all monitors.” will be displayed on the secondary
screen. (Excluding power and input mode selection operation)
* Settings may not be reected depending on the state of the
connected monitors.
[Example] If the power for the primary is turned ON, the power
for all the monitors will be turned ON.
Secondary
ID No.: 2
Secondary
ID No.: 3
Primary
ID No.: 1
Secondary
ID No.: 4
Power ON Power ON
Power ON
Power ON
Press to turn the power ON
POWER
Press or to select EXPAND ITEM, and press or
to select to perform this action or not.
OFF ...........For all monitors, only power, input mode
selection, and product information display
operations will be recognized.
ON .............For all monitors, all operations will be
recognized.
After returning to the normal screen with
procedure 3, when 5 minutes have passed from
the end of operation, it will automatically return
to OFF.
ALL [EXPAND ITEM]
will be displayed on the menu of
the primary.
*
Even when REMOTE CONTROL MODE is set
to ALL MONITORS, certain settings such as
LAN settings and ID No. settings will not be
reected on the other monitors.
3. Press
or to select OK, then press
MENU
and
return to the normal screen.
4. Perform operation.
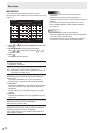
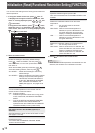
Caution
• When the remote control mode is set to ALL MONITORS
and EXPAND ITEM is set to ON, performing remote control
operations that change adjustment values will result in
the secondary adjustment values being the same as the
primary adjustment values.
Secondary
ID No.: 2
Secondary
ID No.: 3
Primary
ID No.: 1
Secondary
ID No.: 4
Secondary
ID No.: 2
Secondary
ID No.: 3
Primary
ID No.: 1
Secondary
ID No.: 4
VOLUME 12 VOLUME 11
VOLUME 10
VOLUME 9
VOLUME 10 VOLUME 10
VOLUME 10
VOLUME 10
Press to lower the volume
Be careful of this when adjusting individual displays.
TIPS
• You can copy the setting values of the primary to other
monitors with COPY SETTING VALUE. (See page 11.)
• The buttons on the monitor itself (primary) are also effective
in remote control mode.
• When monitors connected in a daisy chain are in standby
mode for LOW POWER, operation cannot be performed for
subsequent monitors.