


E
24
USER
AdjustseachitemwhentheWHITEBALANCEissetto
USER.
R-CONTRAST ....Adjustsbright-tonedredcomponent.
G-CONTRAST ....Adjustsbright-tonedgreencomponent.
B-CONTRAST ....Adjustsbright-tonedbluecomponent.
R-OFFSET ..........Adjustsdark-tonedredcomponent.
G-OFFSET .........Adjustsdark-tonedgreencomponent.
B-OFFSET ..........Adjustsdark-tonedbluecomponent.
COPY TO USER
CopiesthevaluesetforPRESETtotheUSERsetting.
Select “ON” and then press
MENU
.
GAMMA
Selectsthegamma.USERsetsthegammatothesent
value(seepage36).(InPIPmode,themainsidesettingis
reectedintheimage.)
WhenusingLOCALDIMMING,itcontrolsthebrightnessper
area. So, the gamma may differ from the set value.
LOCAL DIMMING
Automatically controls the backlight brightness per area
according to the image. Increasing the level of this setting
will result in higher contrast of the image, and will lower the
monitor power consumption.
Lightleakageand/oraring-likeappearancemaybeseen
dependingontheimage.Changethesettinginthissituation.
(InPIPmode,themainsidesettingisreectedintheimage.)
Whenusingmultiplemonitors,ifthereisadifferenceinthe
brightnessbetweenthemonitors,adjustthesetting.
POWER LIMITED
CanbesetwhenLOCALDIMMINGisHIGH.Setthevalue
sothatitissmallerthanthesetpowerconsumption(see
page56.)byadjustingthebrightness,etc.
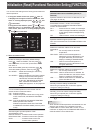
DISPLAY COLOR PATTERN
Displaysacolorpattern.Canbedisplayedwhilethemenu
screen is displayed, so you can refer to the pattern while
adjustingtheimage.
OFF ....................No pattern display.
WHITE ................Whitesinglecolorpatterndisplay.
RED ....................Red single color pattern display.
GREEN ...............Greensinglecolorpatterndisplay.
BLUE ..................Bluesinglecolorpatterndisplay.
USER.................. R e d/green/blue mixed color pattern display.
WhenUSERisselected,seteachcolor’s
level.
RESET
ResetsthevaluesofthePICTUREmenuitemstothefactory
preset values.
Select “ON” and then press
MENU
.
n
AUDIO
TREBLE
Adjuststhevolumeoftreble-levelsound.
BASS
Adjuststhevolumeofbass-levelsound.
BALANCE
Adjuststhebalanceoftheaudiosoundbetweenrightand
left.
RESET
ResetsthevaluesoftheAUDIOmenuitemstothefactory
preset values.
Select “ON” and then press
MENU
.
n
SETUP
OSD H-POSITION
Adjuststhehorizontaldisplaypositionofmenuscreen.
OSD V-POSITION
Adjuststheverticaldisplaypositionofmenuscreen.
MONITOR
Select the installation direction of the monitor.
LANDSCAPE ............Horizontal orientation
PORTRAIT ...............Verticalorientation
LANGUAGE
Sets the display language for the menu screen.
POWER ON DELAY
You can delay the screen display after the monitor is turned
on.Theperiodcanbesetupto60secondsinunitsofone
second.Whenthisfunctionisactivated,thepowerLED
ashes(atapprox.1secondinterval)inorange.Thisfunction
isdisabledwhen0isspecied.
OPERATION MODE
MODE1 ......OFFIFNOOPERATIONissettoON,and
STANDBYMODEissettoLOWPOWER.
(Thesesettingscannotbechanged.)
MODE2 ......Willperformstandardoperation.
OFFIFNOOPERATIONissettoOFF,and
STANDBYMODEissettoSTANDARD.These
settings can be changed.
STANDBY MODE
WhenSTANDARDisselected,startuptimefromstandby
mode is reduced. Note, however that, more power will be
consumed in standby mode.
WhenLOWPOWERisselected,currentconsumption
is reduced while the monitor is in standby mode. Note,
however, that the startup time from standby mode becomes
longer.
IfsettoLOWPOWER,certainRS-232Ccommandscannot
be used in standby mode, and control via LAN will be
disabled.
OFF IF NO OPERATION
Determineswhetherornottosetthemonitortogointo
standby mode when there is no operation from the remote
controlunit,RS-232Ccommands,orLANforover4hours.
HOT PLUG CONTROL
SetswhethertousehotplugcontrolforthePC/AVHDMI
andPC/AVDVI-Dinputterminals.
RS-232C/LAN SELECT
Selects the method with which to control the monitor from
the computer.
ID No. SET
AssignsIDnumberstomonitorsconnectedinadaisychain
(seepage34),usingtheremotecontrolunitorRS-232
cables.
Thenumbers1to255areavailableforIDnumbers.
If“0”isset,thesystemregardsthisasthestatewherenoID
number is set.
AUTO ASSIGN ID No.
IDNo.tobeusedwillbeautomaticallyassignedwhen
multiplemonitorsareconnectedwithRS-232C.
Select ON, then press
MENU
. Perform operations with the
primary monitor.
Menu Items