


– 12 –
SECTION 4
SERVICE MODE
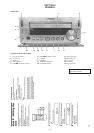
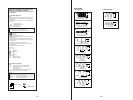
Key Check Mode for Complete Lighting of LED/Fluorescent Display Tube
• Perform this mode to analyze and check malfunctions such as display defects and when buttons do not work.
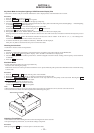
Procedure:
1. Press the 1/u button to turn on the power.
2. Press the DISPLAY button and ^ button together.
3. All LEDs and the fluorescent display tube will light up completely.
4. Pressing the FUNCTION button here will light the fluorescent display tube in the following order; Partial lighting 1 n Partial lighting
2 n Complete lighting n Partial lighting 1······
Turning the VOLUME dial will switch the lighting order of the LED.
To end without shifting to the key check mode, press the 1/u button to end.
5. Pressing the p button sets the key check mode.
6. During the key check mode, “KEY=0 JOG=0” will be displayed on the fluorescent display tube.
Pressing a button will increase the value of “KEY=”. However the value will not increase for buttons which have already been pressed
once.
Rotating the VOLUME knob in the clockwise direction increases the value of “JOG=” in the order of 1, 2, 3.... and rotating in the
counterclockwise direction decreases in order of 10, 9, and 8.
7. To end the check mode, press all buttons (8 buttons). “KEY-OK” will be displayed.
Then press any button, and disconnect the power cord from the outlet.
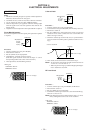
Checking the Sub-Clock
• Perform this mode to check clock operations.
Procedure:
1. Connect an oscilloscope and frequency counter between the pin (TP791) and ground of IC701 of the MAIN board.
2. Press the § and 1/u buttons together to display “91P = 32.768k” on the fluorescent display tube.
3. Check that the signal on the oscilloscope becomes a 32 kHz rectangular waveform and the reading of the frequency counter becomes
32.768 kHz.
4. Press the 1/u button to end.
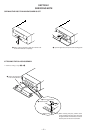
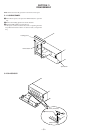
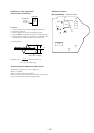
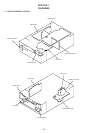
Sled Servo Mode
• In this mode, the CD sled motor can be operated freely.
Execute it when cleaning the pick-up.
Round holes can be seen on the topmost board when the case is opened. Move the pick-up and clean off the dirt in these round holes using
a cotton swab.
Procedure:
1. Press the DISPLAY and § buttons with the power of the unit OFF.
2. When the sled servo is set, “MANUAL” is displayed on the fluorescent display tube.
3. Pressing the +/TUNING/) button when the CD is in the stop state moves the pick-up to the outer track. Pressing the =/
TUNING/0 button moves it to the inner track.
4. To end this mode, perform the following steps.
1) Move the If not, the disc cannot be removed.
2) Press the DISPLAY and § buttons together.
Note:
• When ending this mode, be sure to move the pick-up to the innermost circumference. If not, the disc cannot be removed.
• Do not move the sled motor more than required as this will damage the gears.
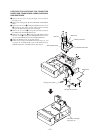
Round holes for cleaning
Initializing (Forced Reset)
• Perform this mode when resetting the unit or when returning the unit to the customer.
• The preset frequency of the tuner, etc. will be the settings at shipment.
Procedure:
While pressing the 1/u button, insert the power cord into the outlet.