


pg. 10 of 13 P1005089 Rev. C
continued
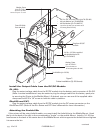
Install the Output Cable from the DC/DC Module
QL 420:
Plug the output voltage cable from the DC/DC module into the battery pack connector of QL 420.
(Note: In some installations it may be easier to plug the charger cable into the battery pack prior
to securing the Printer to the Mobile Mount.) If desired, you can use one of the supplied cable
clamps and a #6-32 x 1/4” screw to hold the cable in position.
QLn420 and P4T:
Plug the output voltage cable from the DC/DC module into the DC power connector on the
Qln420 and P4T. (Refer to the QLn Series and P4T User’s Manuals for more information.)
Attaching the Fanfold Bin
If the printer will be using fanfold media, you must install the fanfold bin to the Mobile Mount. Hook
the lip on the back of the tray to the corresponding “hooks” on the mobile Mount. Install a 1/4- 20 Hex
head screw to the back of the center bar on the Mobile Mount which supports the fanfold bin and tighten
it to secure the bin.
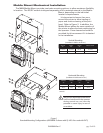
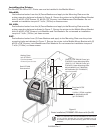
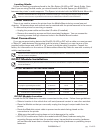
Figure 7:
Printer Installation (QL 420 shown)
• #8-32 x 3/8” Truss Hd. Screw (p/n TH-SD1405)
• #8 Lock Washer (p/n TH-WB0708)
• #8 Flat Washer (p/n TH-WA0712)
(4 p/u for QL 420; 2 p/u at lower set of
mounting holes for P4T))
Plug from DC/DC
module
Fanfold Bin (p/n 52520)
1/4-20 x 1/2” Bolt, supplied
with Mobile Mount Kit
(p/n TH-SK2007)
Washer, Foam
(p/n AT17342-1
4 p/u for QL 420*)
*
4th Mounting Hole not visible
Washer, Foam
(p/n AT17342-1
2 p/u at lower set
of mounting holes for P4T)
Data I/O Cable
from terminal