


pg. 4 of 13 P1005089 Rev. C
Tools Required for Installation
• An electrical drill, drill bits 1/4”(6 mm))
• Taps-1/4-20 and #6-32 (M6 and M3).
• Common hand tools.
References
• The QLn Series, QL Plus Series, and P4T/RP4T User Guides
• The RCLI-DC Mobile Charger Installation Guide, or
• The 50W. DC/DC Power Supply P4T (AT18488-1) Installation Guide
Contents of the MM4 Mobile Mount Package
• The Mobile Mount Bracket Assembly
• The Lift Truck Mounting Bracket
• The Fanfold Bin
• A plastic bag containing mounting hardware, and the Fanfold Spacer
• This Guide
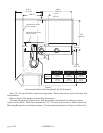
Introduction to Installation
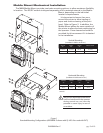
The MM4 Mobile Mount allows you to mount a QLn420, QL 420 or P4T printer into virtually
any vehicle. A separately supplied DC/DC power supply appropriate to each printer model can
provide a source of power to run and charge the printer’s battery from the vehicle’s electrical
system.
Installation of the DC/DC power supply is covered in the Installation Guide supplied with
each system.
In most installations, the power cable is wired to the vehicle’s battery power system
indirectly through a power take-off point. Some models of the DC/DC supplies offer the
option of accessing input power from the vehicle’s cigarette lighter or power adapter.
CAUTION: Under no circumstances should the equipment be attached directly to the vehicle’s
battery or an AC power source without a proper fuse.
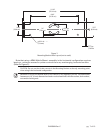
Since each situation or equipment type may pose unique requirements, mounting hardware
selection and mechanical installation shall be the responsibility of the installer. Zebra
recommends using self-locking (ESN) nuts, bolts, and/or lock washers for installing the mount.
The mount is pre- drilled for 1/4” (M6) mounting hardware.
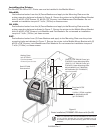
Your tasks are to:
• Mechanically install the MM4 Mobile Mount
• Install the DC/DC converter system (if used in this installation) according to the
appropriate Installation Guide
• Connect the Data I/O cable from the data terminal (if used) and the output cable from the
DC/DC supply system to the printer.
Decide where you will mount the printer, then proceed with the following instructions.
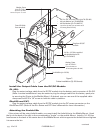
Installing a Terminal
When you are installing the MM4 Mobile Mount, you may also be installing a terminal at
the same time. Follow the terminal manufacturer’s instructions for installing their unit. If the
printer and terminal are linked together with a data cable it typically should be no longer than
six (6) feet (183 cm).
Some installations may require the terminal and printer to communicate via radio frequency
(RF) rather than cables.
Plan your installation with these considerations in mind, and locate the printer so that the
operator can easily load printing media and operate the printer’s controls.