6 © Titan Tool Inc. All rights reserved.
Preparing the Spray Material
The sprayer is designed for use with water-based texture materials
only. Prepare the material to be sprayed according to the
guidelines given by the material manufacturer as a reference point.
Do not use solvent-based materials in the sprayer.
Use of the wrong material can cause a fire and can
seriously damage the sprayer.
The proper mixing of the spray material is very important. Use
clean water only. Mix the material to a smooth consistency
before pouring it into the hopper. The sprayer will not operate if
the material is too thick.
A ow funnel is supplied with the sprayer to help
determine the proper thickness of the spray
material. The material should be mixed to a
smooth consistency that will ow evenly through
the ow funnel.
NOTE: Check the consistency of the material
often. After sitting in the hopper for awhile,
the material may thicken and need to be
thinned with additional water. Using the
provided hopper cover will reduce material
evaporation and help prevent change in material
consistency.
Spraying
1. FIll the hopper with the properly mixed spray material as
determined by using the ow funnel.
2. Move the air adjustment valve on the spray gun
to the half-open (45º) position.
3. For the PowrTex 600
DD only, turn the uid
pressure regulator fully counterclockwise to its minimum
pressure position.
4. Turn on the sprayer by moving the ON/OFF
switch to the ON position.
5. For the PowrTex 600
DD only, turn the uid
pressure regulator clockwise until the pressure gauge
reads 30 PSI.
6. Trigger the spray gun into a waste container. Continue
to trigger the spray gun into the waste container until any
remaining water is ushed from the system and material
begins owing from the gun.
7. Trigger the spray gun into the hopper to circulate material
through the system until a steady stream ows from the gun.
8. Move the air adjustment valve on the spray gun
to the desired position.
9. For the PowrTex 600DD only, adjust the uid
pressure regulator until the material from the gun
ows evenly with no pulsing. Try to keep the uid pressure
regulator at the lowest setting that maintains even, steady ow.
PowrTex 600DD
Pressure
Gauge
Fluid
Pressure
Regulator
NOTE: For the PowrTex
600DD only, the
recommended
working pressure
setting for the uid
pressure regulator
is 40–50 PSI. It is
recommended not to
exceed 80 PSI.
10. Test the spray pattern on a
piece of cardboard. Fine tune the spray pattern using
the uid adjustment knob and air adjustment valve on the
spray gun. Refer to the “Spray Gun Operation” section for
detailed information on gun adjustments.
NOTE: When turning the unit on and off in rapid
succession, trigger the gun slightly to relieve
air pressure in the air hose for ease of restart.
Failure to do so may cause the compressor to
stall and trip the thermal protector switch.
Pressure Relief Procedure
Be sure to follow the Pressure Relief Procedure
when shutting the unit down for any purpose,
including servicing or adjusting any part of the
spray system, changing or cleaning spray nozzles,
or preparing for cleanup.
1. Turn off the sprayer by moving the ON/OFF
switch to the OFF position.
2. For the PowrTex 600DD only, turn the uid
pressure regulator fully counterclockwise to its minimum
pressure position.
3. Move the air adjustment valve on the spray gun
to the open (vertical) position.
4. Trigger the gun into a waste container to remove
any air and uid pressure that may still be in the
system.
5. Unplug the sprayer.
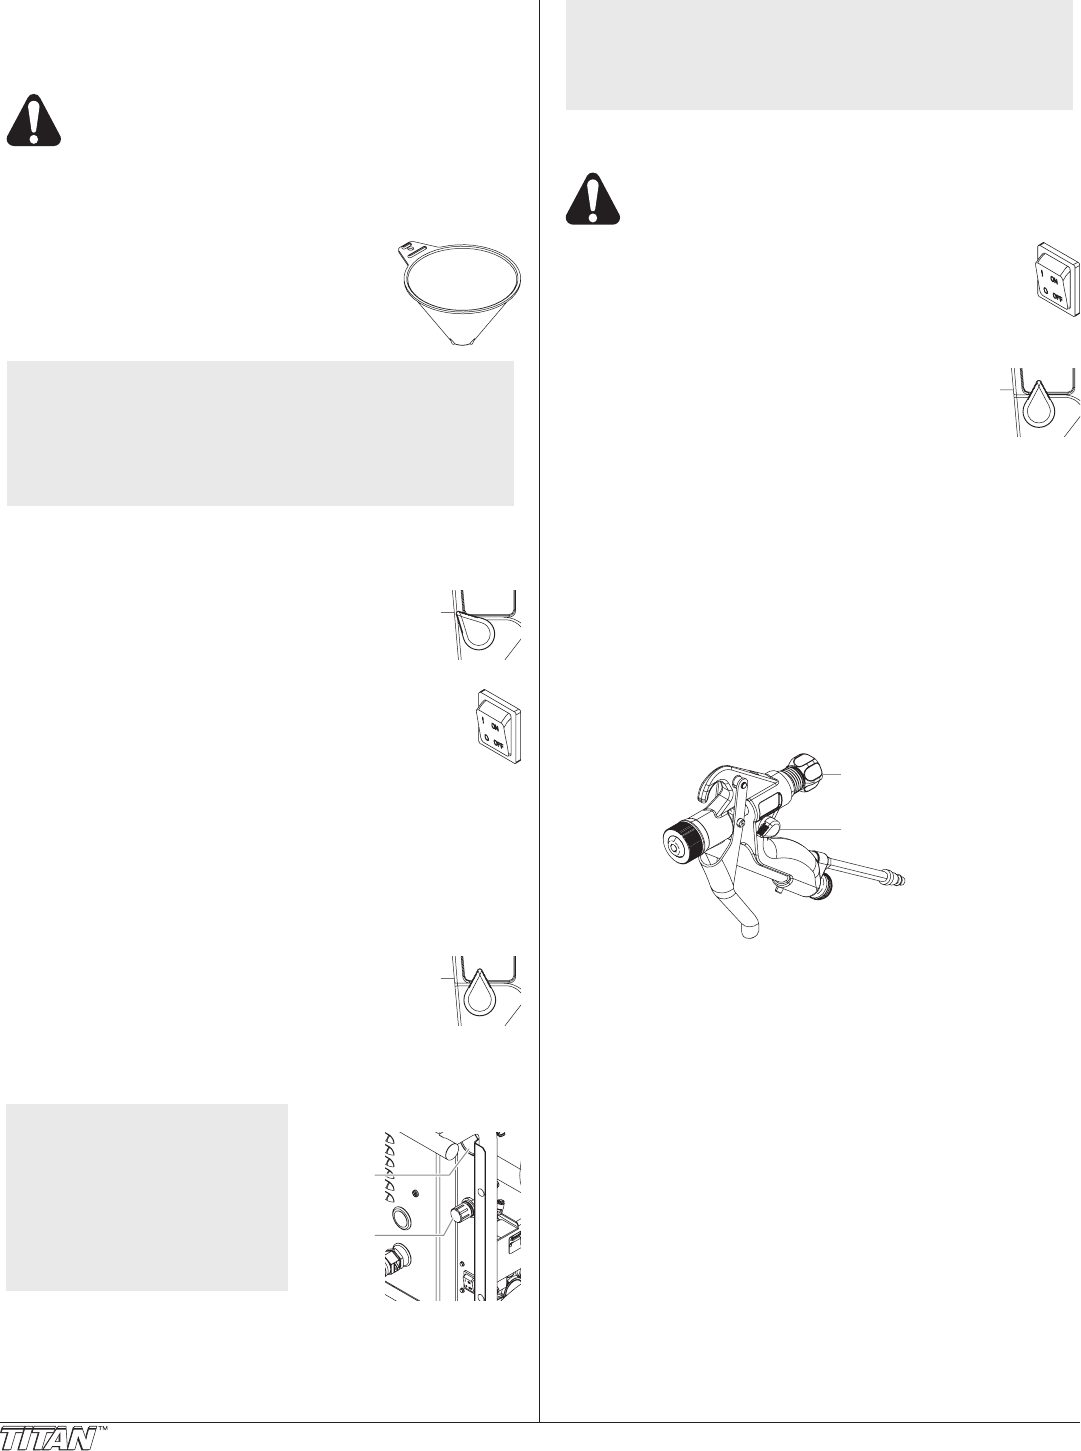
Spray Gun Operation
The following section describes how to use the spray gun to
achieve professional results. Remember that practice and
experimentation with the controls, nozzle size, and spraying
technique is the best way to nd the desired spray pattern.
Using the Spray Gun Controls
The controls on the spray gun provide the opportunity to adjust
and ne tune the spray pattern for the different spray materials
that can be used. Make adjustments on the gun and then test
the spray pattern on a piece of cardboard or test surface.
Fluid Adjustment
Knob
Air Adjustment
Valve
Adjusting the Air Flow
Start spraying with the air adjustment valve turned fully clockwise
(vertical) in the open position. If necessary, turn the air adjustment
valve counterclockwise until a good spray pattern is achieved.
Turning the air adjustment valve counterclockwise will decrease
air ow through the gun and increase material output.
Turning the air adjustment valve clockwise will increase air ow
through the gun and decrease material output.
Adjusting the Fluid Volume
Start spraying with the uid adjustment knob positioned to allow
minimum trigger pull. This will create minimum uid volume
owing to the texture nozzle when the trigger is pulled. If
necessary, turn off the sprayer, relieve system pressure, release
the lock nut, and turn the uid adjustment knob counterclockwise
to increase the uid volume owing to the texture nozzle.
Another way to adjust uid volume on the gun is to change the
size of the texture nozzle. A smaller nozzle will decrease the
uid volume. A larger nozzle will increase the uid volume.
Refer to the “Texture Nozzle Chart” in the Parts List section of
this manual for information on nozzle sizes and uses.


