8 © Titan Tool Inc. All rights reserved.
Cleanup
Proper cleaning of the sprayer and spray gun after each use is
the most important step toward maintaining the performance of
the spray system.
IMPORTANT: The sprayer, fluid hose, and gun should be
cleaned thoroughly after daily use. Failure to do so permits
material to build up, seriously affecting the performance of
the sprayer.
Do not allow material to dry inside the hopper, pump, hoses,
or spray gun.
NOTE: Leave the spray gun attached to the air hose and
the compressor running at all times during spray
system cleanup. This will prevent material backup
into the air nozzle and texture shaft assembly.
1. Move the air adjustment valve on the spray gun
to the half-open (45º) position.
2. For the PowrTex 600DD only, turn the uid
pressure regulator fully counterclockwise to its
minimum pressure position.
PowrTex 600DD
Pressure
Gauge
Fluid
Pressure
Regulator
3. Turn on the sprayer by
moving the ON/OFF switch to
the ON position.
4. For the PowrTex 600DD
only, turn the uid pressure
regulator clockwise until the
pressure gauge reads 30 PSI.
5. Trigger the spray gun into
a waste container until all
remaining material is ushed
from the hopper and uid
hose.
6. Turn off the sprayer by moving the ON/OFF
switch to the OFF position.
7. Fill the hopper 1/2 full with clean water.
8. Clean the inside of hopper using a brush and rags.
9. Turn on the sprayer.
10. Trigger the spray gun into a waste container. Continue
holding the trigger open until the water has emptied from
the hopper.
11. Turn off the sprayer.
12. Fill the hopper full with clean water.
13. Turn on the sprayer.
14. Trigger the spray gun into a waste container until half the
water in the hopper is gone.
15. Turn off the sprayer.
16. While triggering the gun, remove the nozzle nut and
texture nozzle from the spray gun and place in a bucket of
clean water.
17. Turn on the sprayer.
18. Trigger the spray gun into the hopper to circulate the water
through the system for a few minutes.
19. Trigger the spray gun into a waste container until the
water has emptied from the hopper and uid hose.
20. Follow the “Pressure Relief Procedure” found in the
Operation section of this manual.
21. Disconnect the uid hose and air hose from the spray gun.
Perform the “Cleaning the Spray Gun” procedure in this
section of this manual.
22. Perform the “Cleaning the Fluid Hose” procedure in this
section of this manual.
23. Disconnect the uid hose and air hose from the sprayer.
Coil up the hoses and store in a dry area.
24. Lift the hopper off of the uid inlet assembly and the cart.
Use the cart handles as guides while lifting the hopper.
25. Clean out the one-way valve assembly at the bottom of
the hopper thoroughly.
26. Replace the hopper onto the cart and uid inlet assembly.
Use the cart handles as guides to position the hopper
down onto the uid inlet assembly.
27. Pour approximately 12 ounces of water into the hopper to
keep the sprayer wet when not in use.
NOTE: For long-term or cold weather storage, pour
straight Liquid Shield Plus into the hopper to
prevent freezing (see the Accessories section of
this manual for part number).
IMPORTANT: Water or material remaining in unit when
temperatures are below freezing can damage motor and/or
delay pump startup. Do not allow unit to freeze.
28. Store the sprayer indoors in a clean, dry area.
Cleaning / Lubricating the Spray Gun
Use the following procedure to clean the spray gun once it has
been removed from the uid hose and air hose.
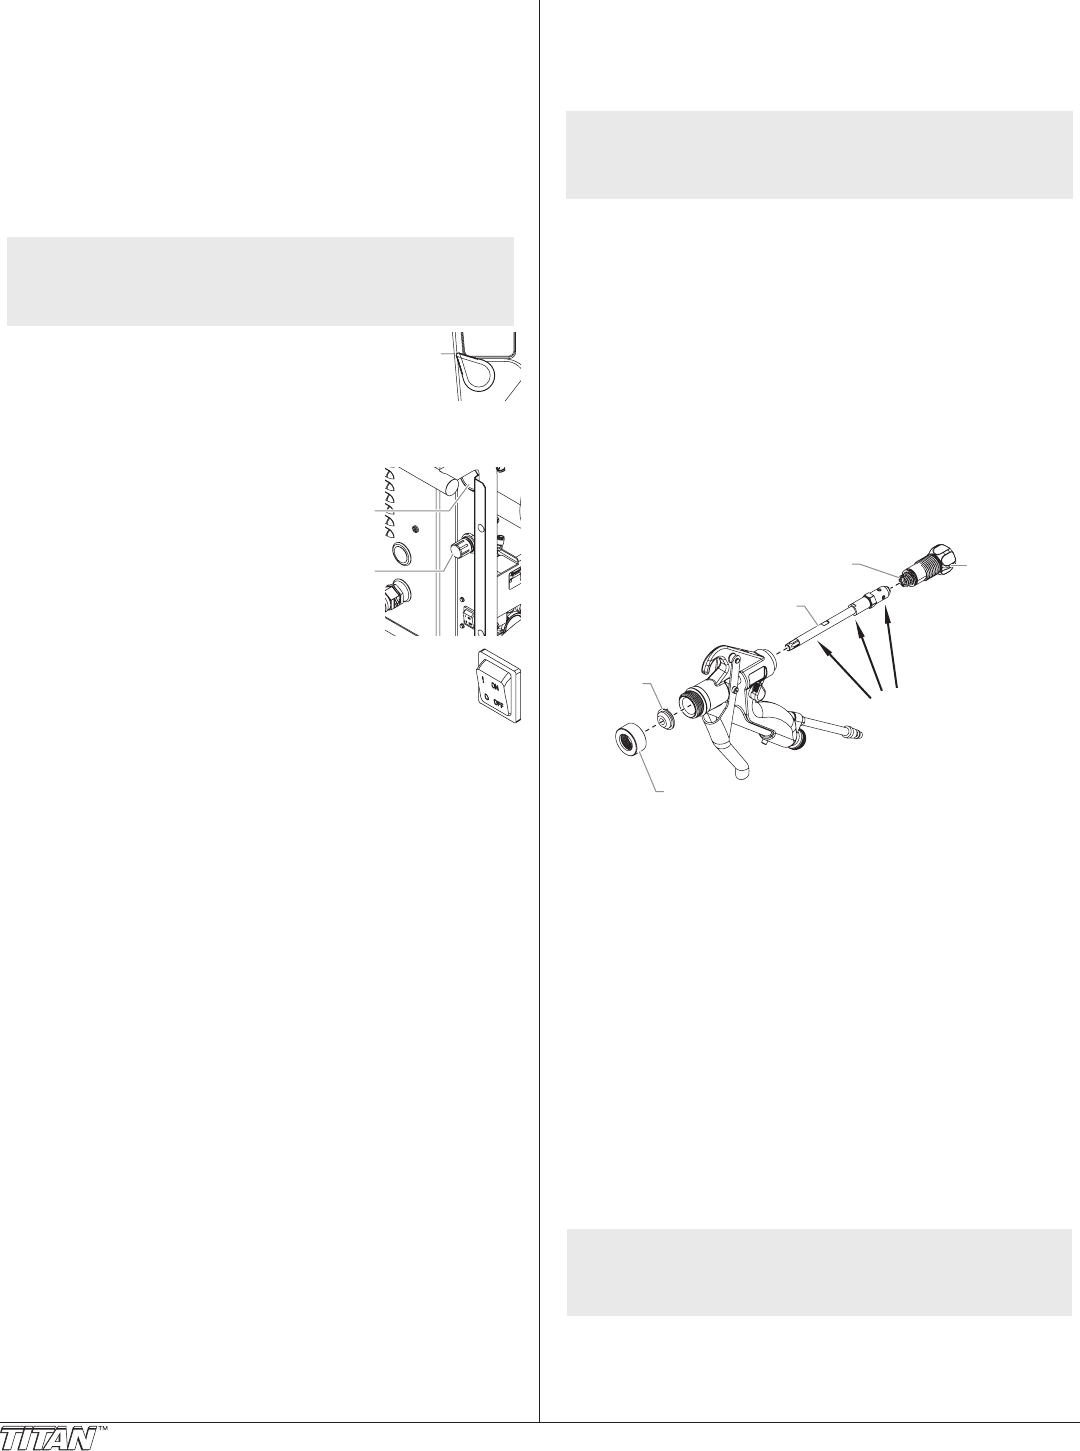
1. If not already removed from the spray gun, remove the
nozzle nut and texture nozzle from the front of the gun body.
2. Turn the uid adjustment knob counterclockwise until it
threads off of the gun body. The adjustment spring inside
the uid adjustment knob will release once the knob is off of
the threads.
Texture Shaft Assembly
Adjustment Spring
Fluid
Adjustment
Knob
Texture
Nozzle
Nozzle Nut
Oil
3. Remove the texture shaft assembly from the gun body.
To remove the texture shaft assembly:
a. From the front of the gun, push on the air nozzle at the
front of the texture shaft assembly until the back of the
texture shaft assembly is accessible at the rear of gun.
b. Pull the texture shaft assembly out of the rear of the
gun body.
4. Clean all components of the the spray gun completely
using water, a soft brush, and a rag.
a. Clean the nozzle nut and texture nozzle.
b. Clean the uid adjustment knob and adjustment spring.
c. Clean the texture shaft assembly.
d. Clean out the uid and air passageways inside the gun.
The uid and air passageways may be rinsed clean by
spraying with a garden hose.
5. Oil the texture shaft assembly using Titan Piston Lube
(refer to the Accessories section for P/N). Apply several
drops of Piston Lube in each location shown in the above
illustration.
NOTE: Failure to lubricate the indicated areas on the
texture shaft assembly could cause the air valve
to become clogged. A clogged air valve will
cause a bad spray pattern.
6. Reassemble the spray gun.


