General Description
This airless line striper is a precision power tool used to spray
many types of material for many types of applications including
parking lots, curbs, and athletic fields. Read and follow this
instruction manual carefully for proper operating instructions,
maintenance, and safety information.
Operation
This equipment produces a fluid stream at extremely high
pressure. Read and understand the warnings in the
Safety Precautions section at the front of this manual
before operating this equipment.
Setup
Perform the following procedure before starting the engine of a
gas-powered line striper.
1. Ensure that the siphon hose
and the return hose are
attached and secure.
2. Position the spray gun.
a. Loosen the support bar
clamp hex screw and
rotate the gun support bar
to the desired position.
Tighten the hex screw
securely.
b. Loosen the gun holder
clamp knob and slide the
spray gun to the desired
vertical and horizontal
(front-to-back) position.
Tighten the knob securely.
3. Turn the pressure control knob fully counterclockwise to
its lowest pressure setting.
4. Make sure the pump ON/OFF switch is in the OFF position.
5. Fill the fluid section oil cup with approximately one
tablespoon of piston seal lubricant (Piston Lube).
Never operate unit for more than ten seconds without
fluid. Operating this unit without fluid will cause
unnecessary wear to the packings.
7. Check the engine oil level. The gasoline engine oil level
is determined by the manufacturer. Refer to the engine
manufacturer's service manual (supplied).
NOTE: The height of the spray gun affects the width of
the spray pattern (i.e., the lower the gun, the
smaller the line width). Tip size also affects
line width.
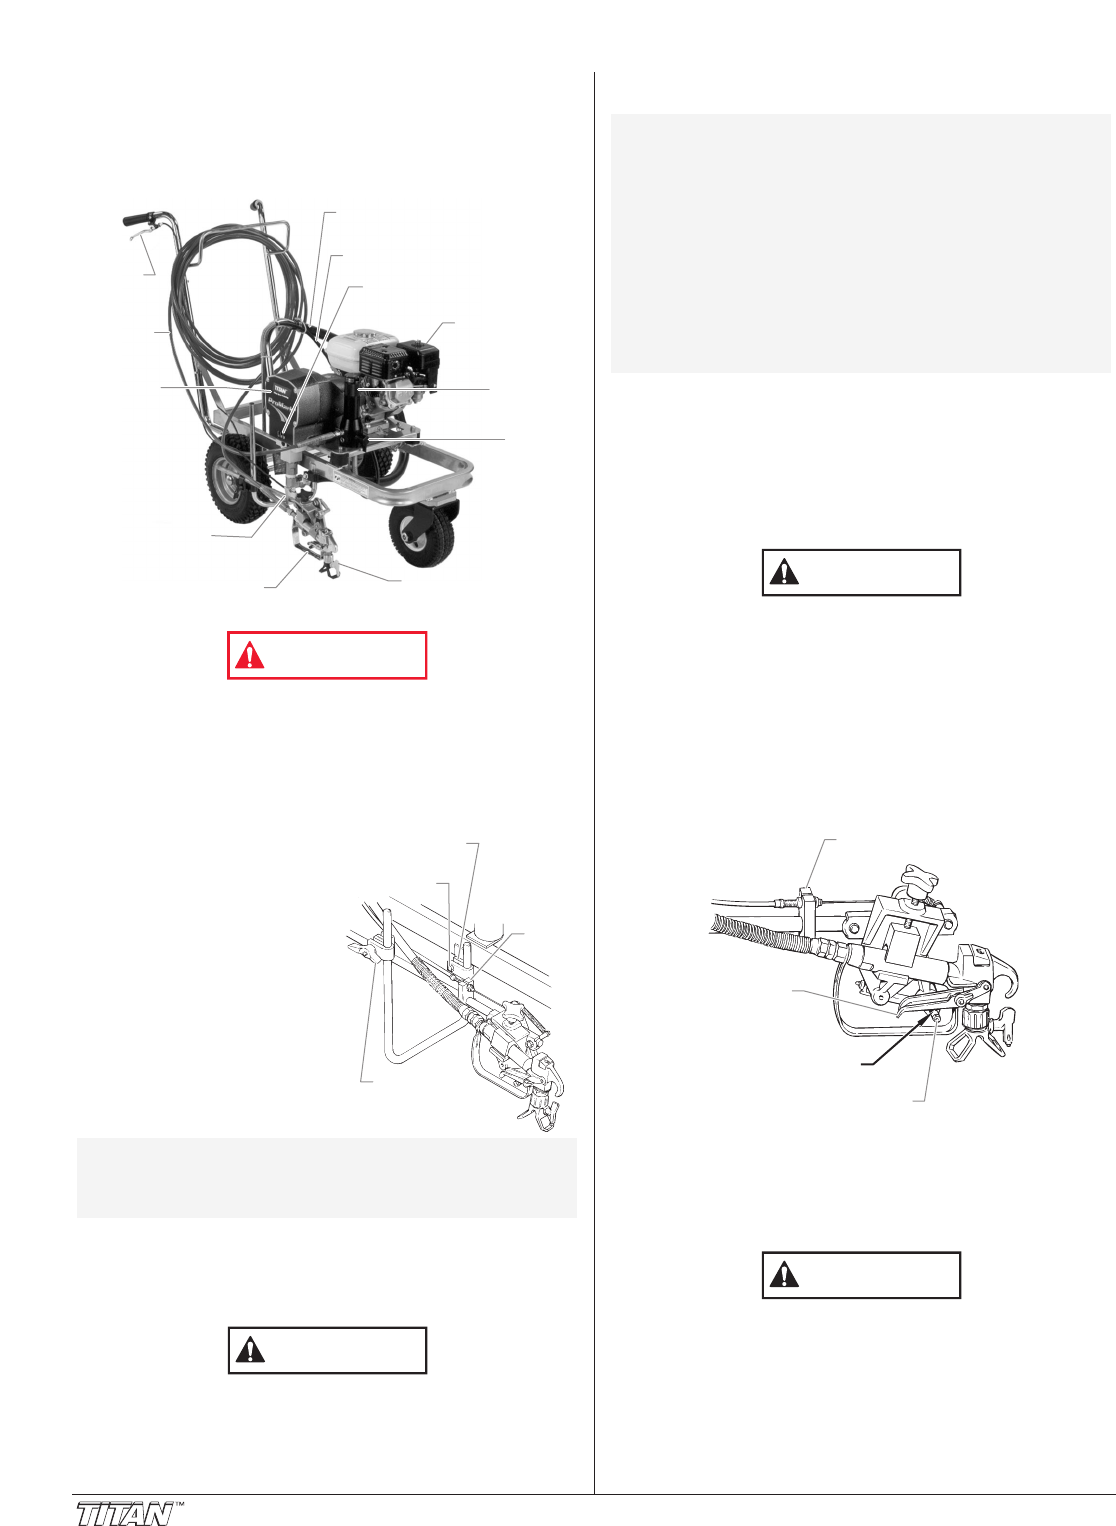
Cable
Block
Gun Holder
Clamp Knob
Gun Support
Bar Clamp
Clamp
Hex Screw
Clamp
Hex Screw
Gun
Trigger
Gun Holder
Assembly
Airless
Sprayer
Spray Gun
Material
Hose
Return Hose
Siphon Hose
Oil Cup
Filter
Assembly
PRIME/
SPRAY
Valve
Tip Assembly
Engine
4©Titan Tool Inc. All rights reserved.
8. Close the fuel shut-off lever and fill the gas tank with
gasoline. Use only high quality, unleaded gasoline.
Adjusting the Trigger Tension
Use the following procedure to adjust the spring tension of the
trigger lever on the gun holder assembly. The trigger lever
pulls and releases the spray gun trigger when operated from
the trigger on the cart. The proper tension ensures that the
gun will shut off when the gun trigger is released. To ensure
proper tension, there should be approximately a 1/32” to 1/16”
gap between the trigger lever and the spray gun trigger.
Always keep the trigger lock on the spray gun in the
locked position while making adjustments to the system.
1. Using a 5/32” hex wrench, loosen the set screw on the
cable block.
2. Move the cable block in the appropriate direction to create
a gap of 1/32” to 1/16” between the trigger lever and spray
gun trigger.
a. Slide the cable block toward the gun to increase the
gap between the trigger lever and spray gun trigger.
b. Slide the cable block away from the gun to decrease
the gap between the trigger lever and spray gun trigger.
3. Tighten the set screw securely.
Preparing a New Sprayer
If this unit is new, it is shipped with test fluid in the fluid section
to prevent corrosion during shipment and storage. This fluid
must be thoroughly cleaned out of the system with mineral
spirits before you begin spraying.
Always keep the trigger lock on the spray gun in the
locked position while preparing the system.
1. Place the siphon tube into a container of mineral spirits
that has a flash point of 60ºC (140ºF) or above.
2. Place the return hose into a metal waste container.
3. Turn the pressure control knob fully counterclockwise to
its lowest pressure setting.
4. Move the PRIME/SPRAY valve to the PRIME position.
5. Move the engine ON/OFF switch to the ON position.
Spray Gun
Trigger
Trigger Lever
1/32" to 1/16" Gap
Cable Block
(set screw on back)
NOTE: The gun support bar and the spray gun can be
mounted on either side of the sprayer. To move
the gun support bar:
a. Remove the support bar clamp hex screw and
nut.
b. Move the gun support bar to the opposite
side of the cart.
c. Align the support bar clamp with the bracket
on the cart.
d. Thread the clamp hex screw through the gun
support bar clamp and the bracket on the
cart. Place the nut on the end of the clamp
hex screw and tighten securely.


