


23-EN
Adjusting and Storing the Time Correction
(Storing available on CDA-9815RB/CDA-9813R
only)
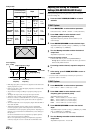
Before performing the following procedures, refer to “About Time
Correction” (page 21).
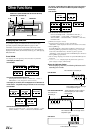
1
Press T.CORR/X-OVER to make time corrections.
Each press changes the mode as follows:
Bass Focus mode → Time Correction mode → normal mode
→ Bass Focus mode
2
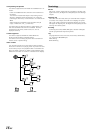
Press BAND/TEL. to select a speaker to be
adjusted.
CDA-9815RB/CDA-9813R
F – L → F – R → R – L → R – R → S – L → S – R → F – L
CDA-9812RX/CDA-9811R
F – L → F – R → R – L → R – R → F – L
3
Turn the Rotary encoder to adjust the desired
time correction value.
To store the adjusted contents (CDA-9815RB/CDA-9813R only)
1) Press and hold any one of the preset buttons (1
through 6) for at least 2 seconds into which you wish to
store the adjusted contents.
4
Repeat step 2 and 3 to set another speaker.
5
After setting, press and hold T.CORR/X-OVER for
at least 2 seconds to return to normal mode.
• If no operation is performed in 15 seconds, the unit returns to
normal mode.
Recalling the Stored Time Correction
Settings (CDA-9815RB/CDA-9813R only)
1
Press T.CORR/X-OVER to make time corrections.
Each press changes the mode as follows:
Bass Focus mode → Time Correction mode → Normal mode
→ Bass Focus mode
2
Press the preset button (1 through 6) that has
your desired time correction in memory.
3
Press and hold T.CORR/X-OVER for at least 2
seconds to return to normal mode.
• Time Correction mode is automatically cancelled if no operation is
performed within 15 seconds.
Setting the MX Mode
MX (Media Xpander) makes vocals or instruments sound distinct
regardless of the music source. The radio, CD, and MP3, will be able
to reproduce the music clearly even in cars with a lot of road noise.
1
Press MX to select MX ON.
2
Press SOURCE/POWER to select the source to
which you want to apply MX (Media Xpander).
3
Press and hold MX for at least 2 seconds to
activate the level setting mode.
4
Turn the Rotary encoder to select your preferred
level or OFF.
FM (MX level 1 to 3):
The medium to high frequencies become clearer, and
produces well balanced sound at all frequencies.
CD (MX level 1 to 3):
CD mode processes a large quantity of data. This data
processing power takes advantage of CD quality sound
sources.
MP3/WMA/DAB (MX level 1 to 3):
This corrects information that was lost at the time of
compression. This reproduces a well-balanced sound close to
the original.
DVD (Video CD)
(MOVIE MX level 1 to 2):
The dialogue portion of a video is reproduced more clearly.
(MUSIC MX level 1):
A DVD or Video CD contains a large quantity of data such as
music clip. MX uses this data to reproduce the sound
accurately.
AUX (MX level 1):
Choose the MX mode (MP3, MUSIC, or MOVIE) that
corresponds to the media connected.
If two external devices are connected, a different MX
mode for each media can be selected.
5
Press Rotary encoder to return to normal mode.
• To cancel MX mode for all music sources, press MX to turn MX off.
• MX mode is automatically cancelled if no operation is performed
within 15 seconds.
• Each music source, such as radio, CD, and MP3/WMA can have its
own MX setting.
• On disks with both MP3/WMA and CD-DA, when the source
changes from “MP3/WMA to CD-DA” or “CD-DA to MP3/
WMA”, MX-mode switching may delay playback slightly.
• Setting to MX OFF sets MX mode of each music source to OFF.
• This function is inoperable when DEFEAT is set to ON.
• MX mode does not function when MX is set to ON for MW, LW
radio.
• If the unit is connected to an audio processor with the MX function,
such as PXA-H700, etc., the MX processing can be applied to the
audio processor. In this case the audio processor needs to be
adjusted. For details, refer to the Owner’s Manual of the audio
processor.
• When entering RDS signals, the MX operation cannot be
performed.