


19-EN
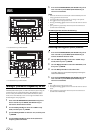
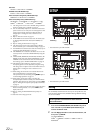
Setting the Treble Control
1
After selecting TREBLE from the 3BAND EQ adjustment
mode, turn the Rotary encoder to select the desired
Treble setting item, and then press ENTER.
WIDTH (Q) CENTER FRQ LEVEL
2
Turn the Rotary encoder to select the desired setting
value, and then press ENTER.
3
Press to return to the previous step.
Setting the Treble Bandwidth (WIDTH (Q))
Turn the Rotary encoder to select the desired treble
bandwidth.
WIDE 0.75 NARROW 1.25
Setting the Treble Centre Frequency (CENTER FRQ)
Turn the Rotary encoder to select the desired treble
centre frequency.
7.5k (Hz) 10.0k (Hz) 12.5k (Hz) 15.0k (Hz)
Setting the Treble Level
Turn the Rotary encoder to select the desired treble level
(-7~+7)
*
.
You can emphasise or weaken the treble level.
* The adjustment can also be made by pressing AUDIO/SETUP
(CDE-W235BT only) or press AUDIO (CDE-W233R only). Refer
to “Adjusting Subwoofer Level/Bass Level/Middle Level/Treble
Level/Balance (Between Left and Right)/Fader (Between Front
and Rear)/Loudness/Defeat” on page 17.
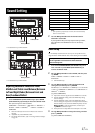
The output level of each source is individually adjustable. For example, if
the TUNER level sounds lower than CD, its output can be adjusted
without affecting the other sources.
The Hands free phone talk level, ring tone level and microphone gain
level can also be adjusted by using this setting (CDE-W235BT only).
Setting item: VOL LV ADJ
Further setting items: TUNER / DISC / USB / IPOD / BT AUDIO
*
/ AUX / PHONE TALK
*
/ RING TONE
*
/ MIC GAIN
*
Setting contents:
-5dB ~ +5dB
* CDE-W235BT only.
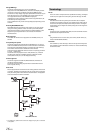
The High Pass Filter on this unit can be adjusted to suit your personal
taste.
Setting item: HPF
Setting contents:
HPF OFF (Initial setting) / HPF 60 (Hz) / HPF 80 (Hz) /
HPF 120 (Hz) / HPF 160 (Hz)
All frequencies above the selected cutoff are output.
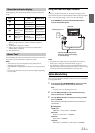
When the subwoofer is on, you can adjust the subwoofer output level
(refer to “Adjusting Subwoofer Level/Bass Level/Middle Level/Treble
Level/Balance (Between Left and Right)/Fader (Between Front and
Rear)/Loudness/Defeat” on page 17).
Setting item: SUBWOOFER
Setting contents:
SUBW OFF (Initial setting) / SUBW ON
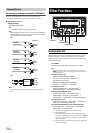
SUBW OFF:
No subwoofer signal is output from the Subwoofer RCA
Connectors (refer to “Connections” on page 42).
SUBW ON:
The subwoofer signal is output from the Subwoofer RCA
Connectors (refer to “Connections” on page 42).
The Low Pass Filter on this unit can be adjusted to suit your personal
taste.
Setting item: SUBW LPF
Setting contents:
LPF OFF (Initial setting) / LPF 60 (Hz) / LPF 80 (Hz) /
LPF 120 (Hz) / LPF 160 (Hz)
All frequencies lower than the selected cutoff are output.
The subwoofer output phase is toggled SUBWOOFER NORMAL (0°) or
SUBWOOFER REVERSE (180°). To adjust the level, turn the Rotary
encoder.
Setting item: SUBW PHASE
Setting contents:
NORMAL (Initial setting) / REVERSE
When the subwoofer is on, you can select either SYS 1 or SYS 2 for the
desired subwoofer effect.
Setting item: SUBW SYS
Setting contents:
SUBW SYS 1 / SUBW SYS 2 (Initial setting)
SUBW SYS 1:
Subwoofer level changes according to the main volume setting.
SUBW SYS 2:
Subwoofer level change is different from the main volume setting.
For example, even at low volume settings, the subwoofer is still
audible.
Setting the Source Volume Level
Adjusting the High Pass Filter
Turning Subwoofer ON/OFF
Adjusting the Low Pass Filter
Setting the Subwoofer Phase
Setting the Subwoofer System