


Change your TV’s input selection to match
its video source
If you’re unable to see TV programs on your screen, first try pressing the TV/VIDEO
button on your remote control to change from Video 1 to Video 2 or Video 3. These
separate video inputs (Video 1, Video 2, and Video 3) must match the incoming video
source—the receiver, DVD player, or other device connected to the TV. If this doesn’t
solve the problem, depending on how your devices are connected, it may be that the
TV’s input selection does not correspond to the input of the AT&T U-verse® TV receiver.
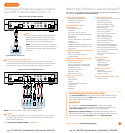
See two examples of how to connect the AT&T U-verse HD-ready receiver to
your HDTV set below.
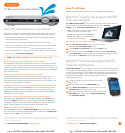
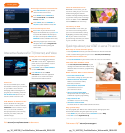
Check how your devices are connected to the TV
Every TV is different in the way the ports
are configured on the back of the TV and
in the way the menus are presented on
the TV screen. Most devices have ports
that require one or more of the cables
shown at right. The manuals for your
devices will have specific directions.
To connect your AT&T U-verse HD-ready
receiver to your HDTV set, the connection
is generally HDMI to HDMI (the highest
quality video/audio connection). You can
also use color-coded component RCA cables (some HDTV sets do not have an HDMI port)
that output audio/video signals from the receiver and plug into matching audio/video RCA
inputs on the back of your HDTV set.
If you’ve connected your TV input using Composite (yellow connector), S-Video, or
Coaxial, you won’t get an HD picture. HD is supported only via HDMI or Component
(red/green/blue). The same holds true for Dolby® Digital 5.1 surround sound, which is
available only via HDMI or TOS Link (optical). The Baseband (red and white connectors)
delivers sound only in stereo.
Check to see if the TV recognizes your video inputs correctly
Many newer TVs have an auto-detection system that will automatically detect everything
that’s connected to the various ports on the back of the TV. However, some TVs have to be
configured manually.
To change the video input selection manually, press TV/VIDEO on your remote control to
locate the video input menu for your specific TV.
The video input menu screen below shows checkboxes next to devices the TV is detecting.
This menu must match the inputs on the back of the TV where video components are
connected in order to correspond with Video 1, Video 2, or Video 3 on your remote
control. Follow the screen prompts to check/uncheck boxes for correct devices.
pg_22_UVE338_PostSaleStarter_WelcomeKit_RELEASE pg_23_UVE338_PostSaleStarter_WelcomeKit_RELEASE
VIDEO
AUDIO
L
R
(MONO)
S VIDEO
AUDIO
L
R
Y
P
b
Pr
VIDEO IN
HD/DVD IN
1080i/720p/480/480i
PC IN
AUDIO OUT
(VAR/FIX)
RGB
AUDIO
L
R
DIGITAL OUT
(OPTICAL)
HDMI
VIDEO
S VIDEO
OPTICAL
AUDIO
POWER
TO WALL
(VIDEO IN)
VIDEO
L
R
NETWORK
USB
HDMI
TO TV
(VIDEO OUT)
Pb
Pr
Y
+12V
DC
HDMI cable
RCA cable
Coaxial cable
S-Video cable
VIDEO OUT
S VIDEO
OPTICAL
POWER
TO TV
(VIDEO IN)
L
NETWORK
HDMI
TO WALL
(VIDEO OUT)
Pb
Pr
Y
+12V
DC
R
USB
AUDIO OUT
23
quick fix guide
Find answers 24/7: a.com/uversesupport
NOTE: Refer to your TV manufacturer’s guide to resolve issues specifically related to your TV
.
Visit a.com/uverse/newcustomer to learn more
AT&T
DVD
AUX
TV
P
O
W
E
R
O
N
D
E
M
A
N
D
R
E
C
O
R
D
P
A
U
S
E
S
T
O
P
R
E
P
L
A
Y
F
W
D
P
L
A
Y
R
E
W
F
F
T
V
/
V
I
D
E
O
R
E
C
O
R
D
E
D
T
V
OK
B
A
C
K
G
O
I
N
T
E
R
A
C
T
I
V
E
P
I
P
B
R
O
W
S
E
A
B
C
MENU
+
+
–
–
VOL
CH
PG
1
2
3
4 5
6
7
8
9
TV
INFO
MUTE
LAST
ABC
DEF
GHI JKL MNO
PQRS
TUV WXYZ
DELETE
SPACE
ZOOM
ENTER
GUIDE
E
X
I
T
T
O
0
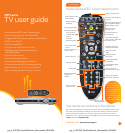
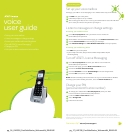
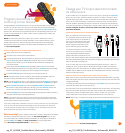
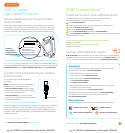
Program your remote to
control up to four devices
During installation, the AT&T button was set up to control your AT&T U-verse HD-ready
receiver. You can also control a TV plus up to two other devices such as a DVD player,
stereo receiver, or home theater in a box by programming the TV, DVD, and AUX mode
buttons. Once the devices are programmed, press the corresponding mode key on the
remote to control that device. To watch a video on how to program your remote, visit
att.com/uverseremote.
NOTE: The instructions below don’t require you to enter a manufacturer’s device
code because most codes are stored in the AT&T U-verse remote’s memory. If you’re
unable to add a device, or want to learn about advanced features like reassigning
mode buttons, refer to the remote’s manual provided at installation. For more info,
visit att.com/userguides.
How to assign devices to TV-DVD-AUX mode buttons
1
Power on the device to be programmed.
2
Point the remote control at the selected device.
3
Press and hold the mode key that matches the device you want to program (TV,
DVD, or AUX) along with the ENTER key. Hold both keys for one second, then
release. The four mode keys on the Remote Control flash twice to indicate you
are in search mode.
4
Search by pressing the SCAN/FF key repeatedly until the device turns OFF (the
selected mode key will flash once for each press of the SCAN/FF key). Pause briefly
between each key press to allow your device enough time to respond.
5
Press the POWER button on the remote to turn the device back on.
NOTE: If the device does not turn off and you have searched all available codes, the
selected mode key will flash 8 times. If this happens, please start over.
NOTE: If the device does not turn on, you may have pressed the SCAN/FF key too many
times. Press the REW/SCAN key to scan backwards and test the POWER button again.
6
Check VOLUME and MUTE. Do not test using REW/SCAN, SCAN/FF, FWD, or
EXIT. If there is any problem with any of the keys, press the SCAN/FF button and
search until you find a code that will operate all the functions properly.
Press the ENTER key to save the programming. The appropriate mode key will give a
long flash, indicating successful programming.
NOTE: If the programming is interrupted or inactive for more than 30 seconds, the mode keys
will flash eight times. This indicates the remote has left the programming mode and returned to
normal operation without saving any changes.
If you have an integrated or combination unit such as TV-DVD, TV-DVD-VCR, etc., each component
of the unit may need to be programmed separately by using the mode keys. For instance, for
a TV-DVD, search for the device code of TV and program into TV mode key, then search for the
Device Code of DVD and program into the DVD mode key.
Want more help? If you’re unable to add a device or want to learn about controlling
the volume on all devices using your remote, visit att.com/userguides. You can also
check the remote’s user manual provided at installation, or watch Help On Demand on
TV: Press MENU, select Help, then Help On Demand to see all program titles.
7