


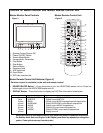

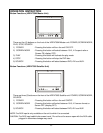
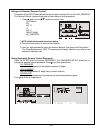
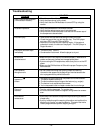
Controls on Satellite Monitor and Satellite Remote Control Unit
Satellite Monitor Panel Controls Satellite Remote Control Unit
1. Remote Control Sensor (IR)
2. Power ON/OFF Button
3. Screen Mode Button
4. Infrared Audio Transmitter
5. Source Button
6. Earphone Jack
7. AUX Input Jack
"
%
!
#
$
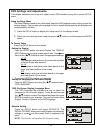
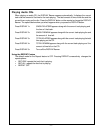
Satellite Remote Control Unit Buttons (Figure 2)
* Function control is available on the unit and the remote control.
1. POWER ON/OFF Button* – Press this button to turn the HRDV700S Satellite Unit on.
2. IRT ON/OFF Button – Press this button to turn the HRDV700S Satellite Unit IR Transmitter ON/
OFF.
3. SOURCE Button
* – The video signals from video equipment connected to the A/V1 or AUX inputs
can be displayed on the monitor by pressing this button. Each time the button is pressed, the
source will change in the following sequence: DVD, AV1 and AUX.
4. PICTURE SELECT Button – Each time this button is pressed, the OSD will display the "adjust-
ment bars" for BRIGHTNESS, CONTRAST, COLOR or TINT. Once the desired adjustment bar is
displayed, use the VOLUME UP/DOWN buttons to adjust the setting. The display will automati-
cally turn off if no adjustments are made within 6 seconds, or if any other button is depressed.
5. VOLUME DOWN Button (–) – Press this button to decrease the volume level of the wired head-
phones. This button is also used to make picture adjustments in the picture select mode.
6. VOLUME UP Button (+) – Press this button to raise the volume level of the wired headphones.
This button is also used to make picture adjustments in the picture select mode.
7. MUTE Button – Press this button to mute the audio. Pressing the button again will restore the
sound to the previous set level.
Figure 1.
Figure 2.
POWER
SCREEN
MODE
AUX
! " $ %
SOURCE
#
-7-