5
HD5212
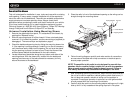
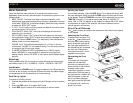
9. Attach one end of the perforated support strap (supplied) to the screw
stud on the rear of the chassis using the hex nut provided. Fasten the
other end of the perforated strap to a secure part of the dashboard
either above or below the radio using the tapping screw and washer
provided. Bend the strap, as necessary, to position it. CAUTION: The
rear of the radio must be supported with the strap to prevent damage to
the dashboard from the weight of the radio or improper operation due to
vibration. The strap also ensures proper electrical grounding of the unit.
10. Re-attach the front panel to the chassis and test radio operation by
referring to the operating instructions for the unit.
NOTE: For proper operation of the CD player, the chassis must be
mounted within 20° of horizontal. Make sure the unit is mounted within
this limitation.
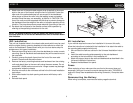
ISO Installation
This unit has threaded holes in the chassis side panels which may be used
with the original factory mounting brackets of some vehicles to mount the
radio to the dashboard. Please consult with your local car stereo shop for
assistance on this type of installation.
1. Remove the existing factory radio from the dashboard or center console
mounting. Save all hardware and brackets as they will be used to mount
the new radio.
2. Carefully unsnap the plastic frame from the front of the new radio
chassis. Remove and discard the frame.
3. Remove the factory mounting brackets and hardware from the existing
radio and attach them to the new radio using the same screws. Do not
exceed M5 x 9 MM maximum screw size. Longer screws may damage
components inside the chassis.
4. Wire the new radio to the vehicle as outlined in the Universal Installation
instructions.
5. Slide radio chassis into dash opening and secure with factory radio
screws.
6. Reinstall dash panel
Kit Installation
If your vehicle requires the use of an installation kit to mount this radio,
follow the instructions included with the installation kit to attach the radio to
the mounting plate supplied with the kit.
1. Wire and test the radio as outlined in the Universal Installation instruc-
tions.
2. Install the radio/mounting plate assembly to the sub-dashboard
according to the instructions in the installation kit.
3. Attach the support strap to the radio and dashboard as described in the
Universal Installation instructions.
4. Replace the dashboard trim panel.
Fuses
When replacing a fuse, make sure the new fuse is the correct type and
amperage. Using an incorrect fuse could damage the radio. The HD5212
uses one 15 amp fuse located below the wiring connector (15 amp fast blow
ATO).
Reconnecting the Battery
When wiring is complete, reconnect the battery negative terminal.
5
6
3
2
4
PRESS
RPT SHFSCN
1
2
3 4
5
6
SEL
CAT/DIR
AUX
IN
MONO
DISP
EQ
BAND
SRC
TUNE/CH
MUTE
A~Z
0~9
PS
ENTER
IPOD
FILE/FOLDER
HD5212
SAT
SAT
READY
READY
ISO INSTALLATION


