


5
E
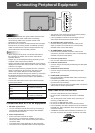
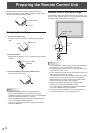
MOUNTING PRECAUTIONS
• Thisproductisforuseindoors.
• AmountingbracketcompliantwithVESAspecicationsis
required.
• Consultyourdealerbeforeinstalling,removingormoving
themonitor.
• Mountingthemonitoronthewallrequiresspecialexpertise
andtheworkmustbeperformedbyanauthorizedSHARP
dealer.Youshouldneverattempttoperformanyofthis
workyourself.Ourcompanywillbearnoresponsibility
foraccidentsorinjuriescausedbyimpropermountingor
mishandling.
• Whenmovingthemonitor,graspbothcornersatthebottom
ofmonitor.Donotgraspthescreenorsensor.Thismay
causeproductdamage,failure,orinjury.
• Usethemonitorinastatethatisperpendiculartothe
horizontalplane.Ifyoutiltthemonitor,donottiltupward
morethan45°ordownwardmorethan20°.
• Iftiltedupward20°ormore,set“BRIGHT”to“20”orlessto
preventinternaltemperatureabnormalities.
• Thismonitorshouldbeusedatanambienttemperature
between41°F(5°C)and95°F(35°C).Provideenough
spacearoundthemonitortopreventheatfrom
accumulatinginside.
For the monitor in horizontal orientation
7-7/8 [20]
*
Unit: inch [cm]
2 [5]
2
[5]
2
[5]
1-7/16 [3.5]
1-13/16 [4.5]
For the monitor in vertical orientation
Unit: inch [cm]
2 [5]
2
[5]
2
[5]
7-7/8 [20]
*
* Ifthemonitorwillbetilted,maintainaclearanceof15-3/4
inch(40cm).
• Ifitisdifficulttoprovidesufficientspacebecausethe
monitorisusedinsideahousingorotherwise,orifthe
ambienttemperatureisabovetherange41°F(5°C)to95°F
(35°C),installafanortakeothermeasurestokeepthe
ambienttemperaturewithintherequiredrange.
• Temperatureconditionmaychangewhenusingthemonitor
togetherwiththeoptionalequipmentsrecommendedby
SHARP.Insuchcases,pleasecheckthetemperature
conditionspeciedbytheoptionalequipments.
• Donotblockanyventilationopenings.Ifthetemperature
insidethemonitorrises,thiscouldleadtoamalfunction.
• Donotplacethemonitoronadevicewhichgeneratesheat.
• Donotusetheproductinlocationswheretheunitis
exposedtodirectsunlightorotherstronglight.Sincethis
productoperateswithinfraredrays,suchlightmaycausea
malfunction.
• Adheretothefollowingwheninstallingthemonitorinits
verticalorientation.Failingtoadheretothefollowingmay
causemalfunctions.
-InstallthemonitorsuchthatthepowerLEDislocatedon
thebottomside.
-Mountsothatthe
markonthebackpointsup.
-SettheTHERMALSENSORSETTINGintheSETUP
menutoPORTRAIT.(Seepage21.)
• Usethesuppliedverticalstickerwhenyouinstallthe
monitorinverticalorientation.
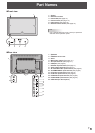
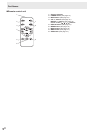
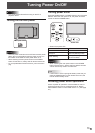
Operation panel
Logo
-Becarefulnottocovertheremotecontrolsensoror
buttons.
Mounting precautions
(for SHARP dealers and service
engineers)
• Besuretouseawall-mountbracketdesignedor
designatedformountingthemonitor.
• ToattachaVESA-compliantmountingbracket,useM6
screwsthatare5/16inch(8mm)to3/8inch(10mm)
longerthanthethicknessofthemountingbracket.
• Thismonitorisdesignedtobeinstalledonaconcretewall
orpillar.Reinforcedworkmightbenecessaryforsome
materialssuchasplaster/thinplasticboard/woodbefore
startinginstallation.
Thismonitorandbracketmustbeinstalledonawallwhich
canendureatleast4timesormoretheweightofthe
monitor.Installbythemostsuitablemethodforthematerial
andthestructure.
• Aftermounting,pleasecarefullyensurethemonitoris
secure,andnotabletocomeloosefromthewallormount.
• DonotuseanyscrewholesotherthanVESAholesfor
installation.