


11
English
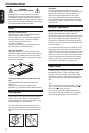
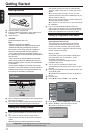
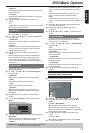
Inserting Batteries
A Open the battery compartment.
B Insert two batteries type R03 or AAA, following the
indications (+ / - ) inside the compartment.
C Close the cover.
CAUTION:
Never throw batteries into a re.
Note:
- Be sure to use AAA size batteries.
- Dispose of batteries in a designated disposal area.
- Batteries should always be disposed of with the
environment in mind. Always dispose of batteries in
accordance with applicable laws and regulations.
- If the remote control does not operate correctly, or if
the operating range becomes reduced, replace batteries
with new ones.
- When necessary to replace batteries in the remote
control, always replace both batteries with new ones.
Never mix battery types or use new and used batteries
in combination.
- Always remove batteries from remote control if they
are dead or if the remote control is not to be used for an
extended period of time. This will prevent battery acid
from leaking into the battery compartment.
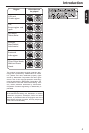
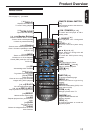
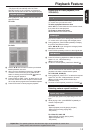
Using the Remote Control to Operate
the System
OPEN/CLOSEDISPLAY
1 2
3
6
5
4
7 8 9
+10 0
T-SEARCH
SETUP
MENU
RETURN TITLE
OK
F.R F.F PREV NEXT
STEP STOP
PLAY/PAUSE
REPEAT A-B
SUBTITLEANGLEAUDIOZOOM
SLOW
PROGRANDOM
SE-R0268
ON/STANDBY
CLEAR
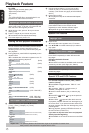
30 30
Within about 6m (19 feet)
A Aim the Remote Control directly at the remote sensor
(IR) on the front panel.
B Do not put any objects between the Remote Control
and DVD Player while operating the DVD Player.
Finding your viewing channel
A Press I/2ON/STANDBY on the DVD player to turn it
on.
B Turn on the TV and set it to the correct video-in
channel. You should see the blue DVD background
screen.
Usually these channels are between the lowest
and highest channels and may be called FRONT,
A/V IN or VIDEO. See your TV' s manual for more
details.
Or, you may go to channel 1 on your TV, then
press the Channel down button repeatedly until you
see the Video In channel.
Or, the TV remote control may have a button that
chooses different video modes.
Or, set the TV to channel 3 or 4 if you are using an
RF modulator.
C If you are using external equipment, (such as
audio system or receiver), turn it on and select the
appropriate input source for the DVD player output.
Refer to the equipment user’s manual for detail.
Setting up Progressive Scan feature
(For Progressive Scan TV only)
The progressive scan display twice the number
of frames per seconds than interlaced scanning
(ordinary normal TV system). With nearly double
the number of lines, progressive scan offers higher
picture resolution and quality.
Before you start...
-Ensure that you have connected this DVD player
to a progressive scan TV using the Y, PB, PR
connection (see page 6).
-Ensure that you have completed the basic
installation and set up.
A Turn on your TV and select the video input
connected to the DVD player (refer to your TV user
manual).
B Press 2ON/STANDBY on the remote control to turn
on the DVD player.
The blue DVD background screen will appear on
the TV.
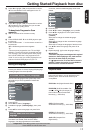
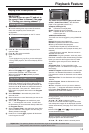
C Press SETUP.
D Press / to select { Video }, then press .
Aspect Ratio :
View Mode :
4:3
Auto Fit
Aspect Ratio
View Mode
4:3
Auto Fit
Language
Video
Audio
Misc
Rating
Smart Picture
JPEG Interval :
5 Seconds
P-Scan
Video Out
Component
E Press / to select { Video Out }, then press .
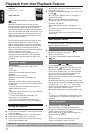
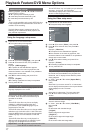
F Select { P- Scan }, then press OK to conrm.
The menu will appear on the TV.
Activating Progressive Scan 1. Ensure
your TV supports Progressive Mode
2. If there is a distorted picture on the
TV, wait 15 seconds for automatic
recover
NoYes
Video Out
Getting Started
Helpful hint: Press to go back to previous menu item.
Press SETUP to exit the menu item.