


5-EN
On handling Compact Discs (CD/CD-R/CD-RW)
• Do not touch the surface.
• Do not expose the disc to direct sunlight.
• Do not affix stickers or labels and do not write on the surface.
•Clean the disc when it is dusty.
•Make sure that there are no bumps around the disc.
• Do not use commercially available disc accessories.
Do not leave the disc in the car or the unit for a long
time. Never expose the disc to direct sunlight. Heat
and humidity may damage the CD and you may not be
able to play it again.
To customers using CD-R/CD-RW
• If a CD-R/CD-RW cannot be played back, make sure the last
recording session was closed (finalized).
•Finalize the CD-R/CD-RW if necessary, and attempt playback
again.
About media that can be played with the CDA-9820XM.
Use only compact discs with the label side showing the CD logo
marks below.
If you use unspecified compact discs, correct performance cannot
be guaranteed.
You can play CD-Rs (CD-Recordable)/CD-RWs (CD-
ReWritable) for audio use on this unit. However, you cannot play
CD-Rs/CD-RWs containing MP3 formatted audio files.
• Some of the following CDs may not play on this unit:
Flawed CDs, CDs with fingerprints, CDs exposed to extreme
temperatures or sunlight (e.g., left in the car or this unit), CDs
recorded under unstable conditions, CDs not designed for
audio use, CDs on which a recording failed or a re-recording
was attempted.
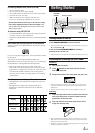
About the alphanumeric display of this unit.
•All English lower case characters are displayed as upper case
on this unit.
• The alphanumeric display in the following table shows
alphanumeric characters/numbers that may be difficult to
distinguish.
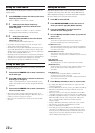
02568ABD
GHKMQRSZ
Alphanumeric
Alphanumeric
Display
Display
Getting Started
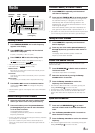
Turning Power On and Off
Press SOURCE/POWER to turn on the unit.
• The unit can be turned on by pressing any other button except eject
c and DISP/TITLE .
Press and hold SOURCE/POWER for at least 3
seconds to turn off the unit.
• The first time power is turned on, the volume will start from level 12.
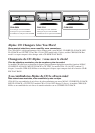
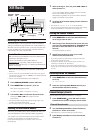
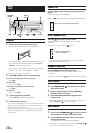
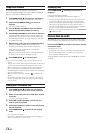
Detaching and Attaching the Front Panel
Detaching
1
Turn off the unit power.
2
Press (Release) at the lower left side until the
front panel pops out.
3
Grasp the left side of the front panel and pull it out.
• The front panel may become hot in normal usage (especially the
connector terminals on the back of the front panel.) This is not a
malfunction.
•To protect the front panel, place it in the supplied carrying case.
Attaching
1
Insert the right side of the front panel into the main
unit. Align the groove on the front panel with the
projections on the main unit.
2
Push the left side of the front panel until it locks
firmly into the main unit.
2
1
1
• Before attaching the front panel, make sure that there is no dirt or
dust on the connector terminals and no foreign object between the
front panel and the main unit.
•Attach the front panel carefully. Hold the panel by its sides to avoid
pushing any buttons by mistake.
SOURCE/
POWER Rotary encoder
DISP/TITLE
MUTE