


128-6838
12 of 16
-12-
CD CHCD CH
CD CHCD CH
CD CH
AA
AA
A
NGER CONTRNGER CONTR
NGER CONTRNGER CONTR
NGER CONTR
OLOL
OLOL
OL
SS
SS
S
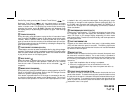
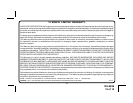
Built into this radio are controls to operate an optional CD changer.
Please check with your Rampage/Audiovox car stereo specialist or call
1-800-645-4994 for recommendations of the models that will work
with this radio. Connection between the radio and CD changer is made
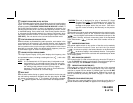
using the supplied ISO-to-DIN 8-pin adapter cable, Part Number
P956CDC.
dp CD CHANGER PAUSE/PLAY SELECTOR ( PAU )
During radio, or CD player operation, press the MODE button to select
operation of the CD changer. CDC will appear, disc play will begin, the
disc and track number will be shown on the display panel, and the disc
icon ( ) will become animated. If a new magazine has been loaded
into the changer, play will begin from the first track of the first disc in the
magazine. If a magazine was already in the changer, play will resume
from the track on the disc previously in play.
During CD changer play, pressing the PAU button once will stop changer
play; PAUSE will appear on the display and the disc icon will remain
stationary. To resume disc play, press the PAU button again and disc
play will resume from the point at which it was interrupted.
dq & dr DISC SELECT (CD+/CD-)
These buttons are used to select the desired disc for play. To advance
to a higher number disc, press the CD+ button
dq. To return to a lower
number disc, press the CD- button dr. The number of the disc in play
will be shown on the display panel.
ds TRACK SELECT ( / )
This button is used to quickly select the beginning of a particular track.
With each momentary press of the Forward Track Select button (
),
the next higher track number will be selected as shown on the display
panel. Similarly, with each momentary press of the Backward Track
Select button (
), the next lower track number will be selected.
dt FOWARD/REVERSE SEARCH (CUE/REVIEW)
High-speed audible search to any forward or reverse section of the
disc can be made with this feature. Press and hold the forward (cue)
button (
) to advance rapidly in the forward direction, or press
and hold the reverse (review) button (
) to advance rapidly in the
reverse (backward) direction. In either case, the disc icon will rotate
faster when search is active.
Once the changer is installed and properly connected, it may be
necessary to press the RESET button behind the radio front panel to
initialize the complete installation.
Adjustment of the audio functions (volume, tone, balance, and fader)
for the CD changer operate in the same manner as they do for radio
play. The following controls will operate the CD changer when it is
installed and connected to this radio. Refer to the owner’s manual
included with the CD changer for instructions on the installation and
correct loading and use of the CD magazine.
1
2
3
4
5
6
7
8
1
2
3
4
6
78
5
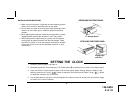
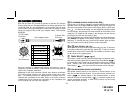
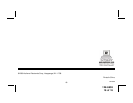
1 CD Left Input (Wht) 1
2 +12 Volts Acc (Yel) 2
3 CD Data Bus (Brn) 3
4 CD Audio Grd (Shld) 4
5 Data Bus Grd (Shld) 5
6 CD Right Input (Red) 6
7 Control Voltage (Blk) 7
8 CDC On (Grn) 8
DIN Connector
ISO Connector
To CDC Cable
Connector
To Radio CDC
Connector
8-Pin Adapter Cable