


128-6838
5 of 16
-5-
bm AUTOMATIC UP/DOWN TUNING ( / )
To select a radio station in the automatic mode, momentarily press the
Up Tuning ( ) button to advance the unit to the next available
station, or the Down Tuning
( ) button to tune downward to the
next available station. The radio will automatically seek the next
strongest station. If the Local mode (LOCAL) is active, the radio will
seek the next strongest local station when either button is pressed.
bn MANUAL SEEK TUNING
This function is used to search rapidly upward or downward for a desired
station. By pressing either tune button for more than 2 seconds, the
radio will enter the MANUAL seek mode as displayed momentarily on
the panel. When either button is pressed and held in this mode, the
radio will tune rapidly up or down and will stop at the station of choice
when the button is released. A momentary press of either button in
this mode will cause the radio to tune upward or downward one digit at
a time. If tuning is not activated within 5 seconds of entering the MANUAL
mode, the radio will automatically revert to the default AUTO mode as
indicated momentarily on the panel.
bo LOCAL/DISTANT SELECTOR (LOC)
This feature is used to select the strength of the signals at which the
radio will stop during Automatic Up/Down Tuning. Pressing the button
will select the Local setting (LOCAL will appear on the display panel for
5 seconds) and tuning will select only strong (local) stations for
reception. Pressing the button again will select the Distant setting (DX
will appear on the display panel for 5 seconds) and the tuning will stop
at a wider range of signals, including weaker (more distant) stations.
bp FM MONO SELECTOR (MONO)
During FM radio operation, this button is used to select mono or stereo
reception of the broadcast signal. Under normal reception conditions,
the unit should be left in the stereo mode as indicated by on the
display panel when tuned to an FM stereo signal. If the stereo signal is
too noisy for comfortable listening, press the MONO button to switch to
mono reception ( the
indication will disappear from the display
panel, MONO will appear for 5 seconds, and MONO will remain at the
bottom left of the display). To return to stereo reception mode, press
the button again; STEREO will momentarily appear on the display panel
for 5 seconds and the
indication returns.
bq PRE-SET SCAN (PS) AUTO-STORE TUNING (AS)
Press this button momentarily to scan the stations pre-set into the
memories on the 3 FM bands or the AM band. The unit will stop at each
pre-set station for 5 seconds before continuing to the next pre-set station
(the pre-set number on the display panel will flash during Pre-Set Scan
operation). Press the button again momentarily to stop Pre-Set Scan
operation and remain on the selected frequency.
Pressing and holding the button for longer than 2 seconds will activate
the Auto-Store Tuning feature which will automatically scan and enter
up to 6 stations into the 6 pre-set memories on each FM band or the AM
band, if selected. After entering the stations into memory, the unit will
automatically stop at each station for 5 seconds so each can be heard.
Press the AS/PS button again to remain on the desired station. If you
have already set the pre-set memories to your favorite stations, activating
the Auto-Store Tuning feature will erase those stations and enter the
new ones. This feature is most useful when traveling in a new area
where you are not familiar with the local stations.
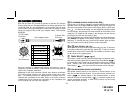
br STATION PRE-SET MEMORIES
To set any of the 6 pre-set memories in each band, use the following
procedure:
1. Turn the radio on and select the desired band.
2. Select the first station to be pre-set using the Automatic Up/Down
bm, or Manual Seek bn Tuning Controls.
3. Press and hold the pre-set button to be set for approximately 2
seconds. The pre-set number will appear on the display panel
indicating that the station is now set into that pre-set memory
position. The station can now be recalled at any time by pressing
that button.
4. Repeat the above procedure for the remaining 5 pre-sets on that
band and for the other 3 bands on the unit.