


behringer.com
10 V-AMP3 User Manual
a 1 for distortion.
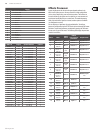
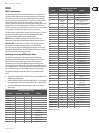
CABINETS – Enter EDIT mode and press the C button to select one of the •
speaker CABINETS. Press the BANK UP and DOWN buttons to select one of the
15 available speaker cabs.
REVERB – Enter EDIT mode and press the D button to edit REVERB settings. •
Press the BANK UP and DOWN buttons to select one of the 9 reverb types.
You may use the REVERB knob to adjust the amount of reverb while in
EDIT mode.
NOISE GATE – Enter EDIT mode and press the E button to edit NOISE GATE •
settings. Press the BANK UP and DOWN buttons to select a noise gate level
(0 = o, 15 = maximum gating eect).
When you have made your adjustments, press the TUNER button to exit EDIT
mode and return to normal operation.
Storing presets
As soon as you make any change to a preset, be it a new amp model,
eect selection, or EQ adjustment, the preset LED will ash. The ashing LED
informs you that in order to keep this new sound, you must save the preset.
To save the preset, simply hold the current preset button down for approximately
2 seconds. When the LED stops ashing, you have saved your current settings in
that preset location.
You do not necessarily have to save an altered preset to its current location.
You may select another preset in that bank, or use the BANK UP and
DOWN buttons to choose another bank and save to one of those 5 presets.
Again, hold the targeted preset button down for approximately 2 seconds until
the LED stops ashing.
Discarding an edited preset/restoring a single
factory preset
If you edit a preset, but decide that you do not like your changes and would
rather return to the original setting, you may simply select another preset
without saving. This way when you return to that preset, it will recall the settings
as they were before you started editing. This method works as long as you do not
save your unwanted edit.
If you do save an edit and would like to return to the original factory preset that
was stored there, hold down the two arrow keys (BANK UP and DOWN) until the
display reads “Pr.” If you would like to keep the original factory setting for this
preset, hold down the preset button for approximately 2 seconds to save.
Restoring all factory presets
All factory presets can be restored as follows:
While holding buttons D and E, power on the unit. “CL” appears in the display.
•
Release the D and E buttons.•
Press the arrow keys (BANK UP and DOWN) simultaneously. •
This erases all saved edits and returns all presets to their factory settings.
Refer to the MIDI chapter for information on saving your settings via MIDI.
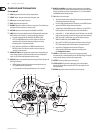
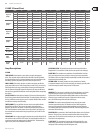
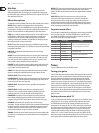
Amp/Speaker Simulation
The heart of the V-AMP 3’s sound lies in its amp and speaker simulation.
With 32 amp simulations and 15 interchangeable speaker cabinets,
you’re guaranteed to nd a tone to t any situation. Not only this, but the
V-AMP 3 eliminates the need to mic an actual speaker, which is dicult to do
properly and creates a lot of excess noise. Any style from jazz to heavy metal can
easily be accommodated, and are further enhanced by the eects and reverb
options. You’re sure to nd many sounds that spur your creativity and allow you
to explore new sonic possibilities.
When you power on the V-AMP 3, it automatically loads the last selected preset.
The LED ring around the AMPS knob shows which amp is currently selected.
If the “17-32” LED is lit inside the display, the second amp model (written in grey)
next to the AMPS LED is active. To select another amp, simply turn the AMPS
knob. Hold the TAP button while turning the AMPS knob to select one of the
17-32 models. You may further edit the sound of the amp by turning the VOLUME,
GAIN, BASS, MID, and TREBLE knobs. Hold the TAP button while turning the
TREBLE knob to adjust the PRESENCE lter.
Each amp has an adjustable DRIVE function that acts similar to changing channels
on an amp. The simulation is still the same, but when switched to distortion
mode (default for most ROCK and METAL amps), the gain setting is signicantly
higher. This feature enables all 32 amps to produce clean or distorted tones,
much like the actual amps themselves would. See ‘Edit Mode’ under the Presets
section for details on changing an amp’s DRIVE setting.
You should always select an amp model rst, then change the cabinet simulation
(if necessary), followed by an eect. To give you a better overview of the
extensive range of amp simulations, we have compiled the following descriptions
of the dierent types of amps.