


5 V-AMP3 User Manual
behringer.com
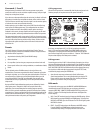
Basic Operation
Plug the included power cable into the AC IN on the side of the unit. 1.
The V-AMP 3 will automatically turn on and resume the previously
selected preset.
Plug your guitar into the INPUT using a ¼" instrument cable. 2.
Connect a monitoring system: 3.
If using a pair of headphones, connect to the PHONES jack. •
If using a guitar amplier, connect a ¼" cable from the V-AMP 3’s •
LEFT LINE OUT jack to the amplier’s eects loop return jack. Use the
Live 3 output conguration for best results. (See Operating Modes
section for details.)
If plugging straight to the house PA system, connect the LINE OUT jacks •
to a stereo channel on the main house mixer. Use the Live 1 output
conguration for best results.
If using the UCA222 to record or jam to a track on your computer, •
you may use the included ¼" TRS-to-RCA adaptor cable to connect the
V-AMP 3’s PHONES jack to the UCA222 and monitor the signal with the
UCA222 headphone jack.
Connect the optional FS112V footswitch to the FOOTSWITCH input. 4.
The footswitch allows you to scroll through the presets while playing.
Pressing and holding down the DOWN button on the footswitch accesses the
tuner. Tap the DOWN button again to return to normal play mode.
Make sure the volume control on your guitar is turned up, then turn up the 5.
MASTER knob to desired level.
NOTE: If the current preset volume is set low, there may be a considerable
increase in volume when you change presets.
Press the TUNER button if you need to tune your guitar. 6.
Press the BANK UP and BANK DOWN buttons to scroll through the banks of 7.
presets. Press the A – E buttons to select a preset in that bank.
Adjust the tone with the GAIN, TREBLE, MID and BASS knobs. 8.
Select a new amp model by turning the AMPS knob. Hold the TAP 9.
button while turning the AMPS knob to select one of the 2nd level amps
(grey lettering).
Add an eect by turning the EFFECT SELECT knob to the desired selection. 10.
Adjust the EFFECTS knob to determine the level of the eect. Hold the
TAP button while turning the EFFECTS knob to adjust the second eects
parameter. (see eects table for details)
Add reverb by adjusting the REVERB knob. 11.
Save your settings. If you have altered a preset or made one from scratch, 12.
the preset LED will blink. In order to save this setting, rst select the bank
you would like to save to, then hold down one of the A – E buttons for
2 seconds. Make sure you save over a preset that you no longer want to keep.
Rock out and have fun! 13.
NOTE: The UCA222 will work on both PC and Mac computers without any
additional software. However, we recommend that PC users install the
low-latency USB ASIO driver for Windows XP/Vista, available for download on
our website at behringer.com. Most users will benet from the most recent
version (2.8.17) of the driver, but rare computer chipsets may require the older
2.8.14 version.
Please visit behringer.com regularly for updates, add-ons and tips regarding
your V-AMP 3.
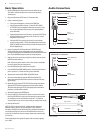
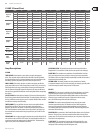
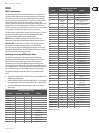
Audio Connections
strain relief clamp
sleeve
ring
tip
sleeve
ground/shield
¼" TRS headphones connector
ring
right signal
tip
left signal
Strain relief clamp
Sleeve
Tip
Sleeve
(ground/shield)
Unbalanced ¼" TS connector
Tip
(signal)
Right channel
Left channel
Tip
Tip
Tip
Sleeve
Sleeve
Ring
Sleeve
¼" TRS to stereo RCA