


9 V-AMP3 User Manual
behringer.com
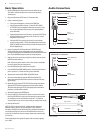
Live mode 1, 2 and 3
When performing live with the V-AMP 3, the most common way to get the
sound to the crowd is to run the unit into an amplier on stage, route your signal
directly into a mixing board, or both.
If you chose to run the outputs directly to the main mixer, Live Mode 1 will be the
best option as it includes amp and speaker simulation, eects, and the 3-band
EQ. You will have no sound on stage unless the signal is sent to a monitor speaker,
so make sure the venue can accommodate this setup.
Another option is to use Live Mode 2 and run the V-AMP 3 into the eects loop
return inputs of 2 dierent guitar amps. This conguration does not feature
speaker simulation and allows the amplier’s natural speaker sound to go
unaltered. In this scenario, the amps would be mic’ed on stage to get the sound
to the house speakers, and having a dedicated monitor would be less important.
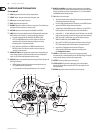
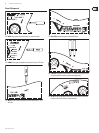
The most practical and versatile way to use the V-AMP 3 in a live setting is using
Live Mode 3. This allows you to send the left output (without speaker simulation)
to an amp’s eects loop return to provide on-stage volume, and also send the
right output (with speaker simulation) to the main mixer for inclusion in the
main house mix.
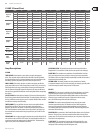
Presets
The V-AMP 3 features 125 presets that are divided into 25 banks. There are
5 presets per bank, all of which can be modied and saved. Each preset consists
of a maximum of ve “ingredients”:
Amp simulation (including GAIN, EQ and VOLUME settings)•
Cabinet simulation•
Pre-amp eects (such as noise gate, compressor, auto wah and wah-wah)•
Post-amp multi-eects (such as delay, modulation, or a combination of both)•
Reverb•
The rst 16 banks consist of 20 dierent tones in the style of clean, rock,
metal and blues. These tones are optimized for either a Stratocaster-style guitar
with single-coil pickups, or a Les Paul-style guitar with humbuckers. These tones
are meant mainly as a guide to get you started and help familiarize you with
some of the possibilities. Eventually, you will probably want to tweak and
customize these to suit your specic liking. Feel free to experiment and nd a
unique sound.
Next you will nd 2 banks dedicated to acoustic presets, followed by 2 banks
of bass guitar presets. Though the V-AMP 3 does not specialize in these
applications, it can accommodate them for recording purposes especially.
Banks 21-24 focus on studio amplication setups that will make your recordings
sound their best. These are comprised of full stack rock models and small combo
models, both with and without eects. Lastly, you will nd a bank full of crazy
and experimental sounds to really stretch your imagination.
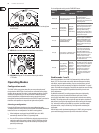
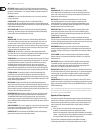
Calling up presets
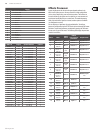
When the unit is powered on, it automatically loads the last used preset. In the
following example, the last preset selected was preset D in bank 25:
In this case, pressing button A, B, C or E will call up another preset within
bank 25. The two arrow buttons (BANK UP and BANK DOWN) enable you to
change banks. The display will show which bank has been selected, but the
preset will not change until you press one of the A – E buttons. The LED beneath
the preset letter lights up when that preset is activated.
Editing presets
Customizing presets in the V-AMP 3 is fast and simple. One option is to call up a
preset you like and tweak it to t your desired sound. If you would like a new amp
model, turn the AMPS knob until you nd the right amp simulation. The VOLUME,
BASS, MID, TREBLE/PRESENCE and GAIN knobs may also be adjusted if necessary.
You may select an eect and adjust its parameters using the EFFECTS knob,
or add reverb by simply turning the REVERB knob.
Apart from the compressor and auto wah, all multi-eects have a •
speed-based parameter. This can easily be adjusted by pressing the TAP
button at least 2 times to the tempo of the music, allowing the eect to
operate in sync with the music you are playing to.
Edit mode
For deeper edits to the preset, press the BANK UP and BANK DOWN buttons
simultaneously to enter EDIT mode. Now you can choose to edit various
categories (MIDI, DRIVE, CABINETS, REVERB and NOISE GATE) by pressing one
of the A – E buttons. The following describes the features and adjustments
of each category:
MIDI – Enter EDIT mode and press the A button to edit MIDI settings. Select a •
MIDI channel by pressing the BANK UP and DOWN buttons. To change from
MIDI OUT to MIDI THRU, press the TAP button. The TAP LED will light up when
MIDI THRU is selected.
DRIVE – Enter EDIT mode and press the B button to edit DRIVE settings. •
Press the BANK UP and DOWN buttons to change between clean
and distorted amp settings. The display will show a 0 for clean and