


7. Install the crossovers
Now that you are satisfied that everything is working correctly, permanently secure the crossover boards. The
recommended location for the crossover boards is the bottom rear and side of the cabinet.
Once again, securing with silicone or hot-melt glue is the recommended fastening method. If using hot-melt glue, it is
recommended to place the glue on the surface of the cabinet and then press the board into it. This prevents the glue
from cooling too rapidly or dripping onto the cabinet or the body, causing injury.
Note:
For curved-sided cabinets
screws may be needed for securing the crossover to cabinet.
If you are using silicone, it is easier to apply the glue to the back of the PC board. Making sure that the mounting
location is horizontal, place the board into its location. You will need to allow the silicone to cure for an hour or so
before you change the orientation of the cabinet.
8. Install the baffle
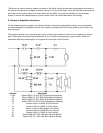
Now you will need to connect the output wires from the crossover to the respective speaker terminals and place the
baffle into the cabinet. With the baffle leaning against the cabinet, solder all driver connections, once again paying
attention to the polarity of the connections.
Note:
The red wires will attach to the terminals that are marked with a
red color or with a + sign.
The baffle can now be installed into the cabinet, working carefully to make sure no wires are trapped between the
baffle and the cabinet. Once the baffle is fully installed, it can be secured via the included machine screws and glued
into place if desired. Using the 4 machine screws by themselves will have adequate holding power to prevent leaks
and vibrations of the baffle. However, for the utmost cabinet strength, the baffle should be glued into place with
polyurethane glue.
Note:
Once the baffle is glued into place, making any changes to the speaker becomes very
difficult. Please listen to the speaker for a period of time with just the machine screws holding the baffle in place to
make sure everything is working correctly before you secure the baffle permanently.
9. Install Grill
The grill has four neodymium magnets which are embedded into the frame. These magnets are arranged to align
with the screws that hold the baffle in place. Simply place the grill on the baffle and realign if necessary.
10. Care and cleaning
To protect the finish of your Dayton speaker system, it is important to use some care when it comes time to clean it.
To remove dust from drivers, grills, or the cabinet tops, a synthetic “feather duster” works well. For more stubborn
dust on the grills or woofers, a vacuum cleaner with gentle brush attachment may be used. It is not recommended to
use any type of cleaning apparatus on tweeter domes; dust will not affect the sound, and the chance of damaging
the dome is high.
For cleaning streaks or fingerprints on the cabinet finishes, an ammonia-based window cleaner is recommended. It
will not affect the finish and will leave a streak-free shine. It is important to use only very soft, clean cloths, and to
wipe gently at the surface. Intense scrubbing or using cloths with debris on them may cause small swirl marks or
scratches. Of course, the best way to maintain the finish on the cabinet is to prevent soiling it in the first place. Never
place drinks or abrasive objects on the top of the speaker.