


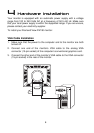


8
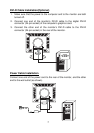
5
5
Windows Software
Installation
To get best performance with Windows 95, 98, Millenium Edition, 2000 or XP
you should set the PC to use the driver supplied with your DV190 monitor.
Windows 95
The first time you start Windows after connecting your new monitor, the
system will detect it and automatically install the driver for Plug and Play
displays. To install the Diamond View DV190 driver and colour profile:
1. Insert the Diamond View LCD Monitor Utilities floppy disk into your
floppy disk drive.
2. Right-click on the Windows desktop and select Properties or open the
Control Panel and double-click Display.
3. From the Display Properties window, select the Settings tab and then
click the Advanced Properties button at the bottom, right corner.
4. Select the Monitor tab and then click the Change button.
5. Click the Have Disk button at the bottom right corner. The Install From
Disk window will appear with the floppy drive A:\ selected. Click OK.
6. Select DV190 from the list and click OK again to install the driver.
7. You will be returned to the Advanced Graphics Properties dialogue
box. Close this window by clicking OK and confirm the subsequent
messages by clicking Yes. Click OK and then Yes once more.
8. The installation is now complete, click OK to close Display Properties.
Windows 98
The first time you start Windows with a new monitor; the system will detect it
and automatically start the Add New Hardware wizard.
1. Click the Next button. Select Search for the best driver for your
device (recommended) and click Next.
2. Insert the Diamond View LCD Monitor Utilities floppy disk into your
floppy disk drive. Select the Floppy disk drive check box and click Next.
3. Click Next again and then click Continue. The driver and monitor colour
profile will be installed. Click Finish to complete the installation.