Extron DTP HD DA4 4K 230/330 and DTP HD DA8 4K 230/330 • Internal Web Pages 24
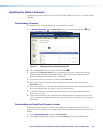
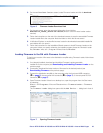
5. Select the DTP HD DA product from the Device Name menu.
6. Select RS-232, USB, or TCP/IP from the Connection Method menu.
7. Depending on the connection method that selected, additional options appear. Make the
appropriate selections for the connection method.
• RS‑232: Select the appropriate options from the Com Port and Baud Rate menus.
• USB: Only the Extron USB Device_0 option is available on the AvailableDevices
menu. Make sure that it is selected.
• TCP/IP: Enter the IP address (default is 192.168.254.254), port number, and
password (if necessary).
8. Click Connect. If the connection is successful, DTP HD DA4 4K 230/330 or
DTP HD DA8 4K 230/330 is displayed in green in the Connected Device panel, followed
by a green check mark.
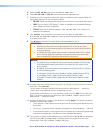
9. Click Browse to locate the Firmware file that was downloaded in step 2.
ATTENTION:
• Valid firmware files must have the file extension S19. A file with any other
extension is not a firmware upgrade for this device and could cause the device
to stop functioning.
• Les fichiers firmware valides doivent contenir l’extension fichier S19. Un fichier
avec n’importe quelle autre extension n’est pas une mise à jour de firmware
pour cet appareil et l’appareil pourrait arrêter de fonctionner.
NOTES:
• The original factory-installed firmware is permanently available on the DA units.
If the attempted firmware upload fails for any reason, the unit reverts to the
factory version.
• By default, when the firmware is downloaded from the Extron site, it is saved in
one of the following paths:
C:\Program Files\Extron\Firmware\folder_name (Windows XP) or
C:\Program Files (x86)\Extron\Firmware\folder_name
(Windows7) where folder_name may be named for the specific model
needed.
10. If multiple units are connected to the computer, it is possible to upload the same firmware to
all of them. Click Add Next.
The first device is added to the Devices section and the Add Device... dialog box
remains open. Add additional devices, by repeating this step.
When adding the last device, (or if only updating a single unit) click Add (do not press Add
Next). The device is added to the device list in the Firmware Loader window and the
Add Device... dialog box closes.
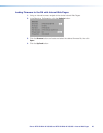
11. Highlight the distribution amplifier in the device list and click Begin. The following indicators
show the progress of the update:
• The Transfer Time section shows the amounts of remaining and elapsed time for
the update.
• The Total Progress section displays a progress bar with Uploading... above it.
• In the Devices section, the Progress column displays an incrementing percentage
and another progress bar. The Status column displays Uploading.
12. The upload is complete when the Remaining Time field shows 00.00.00, the Progress
column shows 100%, and Completed is displayed above the progress bar and in the
Status field. Close the Firmware Loader dialog box.


