


Connecting the Cables
NOTE: For the L5009tm model, it is best to install the APR driver before connecting the hardware.
1. Place the monitor in a convenient, well-ventilated location near the computer.
2. Connect one end of the power cable (1) to the AC power connector on the back of the monitor,
and the other end to an electrical wall outlet.
3. L5006tm: Connect one end of the touchscreen serial cable (RS232) or USB cable (2), but not both,
to the rear connector of the computer, and the other end to the connector on the monitor. Tighten
the two thumb screws on the serial cable to ensure proper grounding. The USB cable does not
have thumb screws.
L5009tm: Connect one end of the USB cable to the rear connector of the computer, and the other
end to the connector on the monitor.
NOTE: The L5009tm model does not include a serial connector.
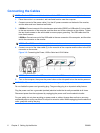
4. Connect one end of the video cable (3) to the rear side of the computer and the other to the VGA
connector on the monitor.
Figure 3-2 Connecting the Power, USB or Serial and VGA Cables
NOTE: Connect either the USB or serial cable to the L5006tm monitor, but not both.
5. Turn on the computer, then press the power button on the side panel to turn the monitor power on.
WARNING! To reduce the risk of electric shock or damage to the equipment:
Do not disable the power cord grounding plug. The grounding plug is an important safety feature.
Plug the power cord into a grounded (earthed) electrical outlet that is easily accessible at all times.
Disconnect power from the equipment by unplugging the power cord from the electrical outlet.
For your safety, do not place anything on power cords or cables. Arrange them so that no one may
accidentally step on or trip over them. Do not pull on a cord or cable. When unplugging from the electrical
outlet, grasp the cord by the plug.
6 Chapter 3 Setting Up the Monitor ENWW