12
UV8020
TUNER OPERATION
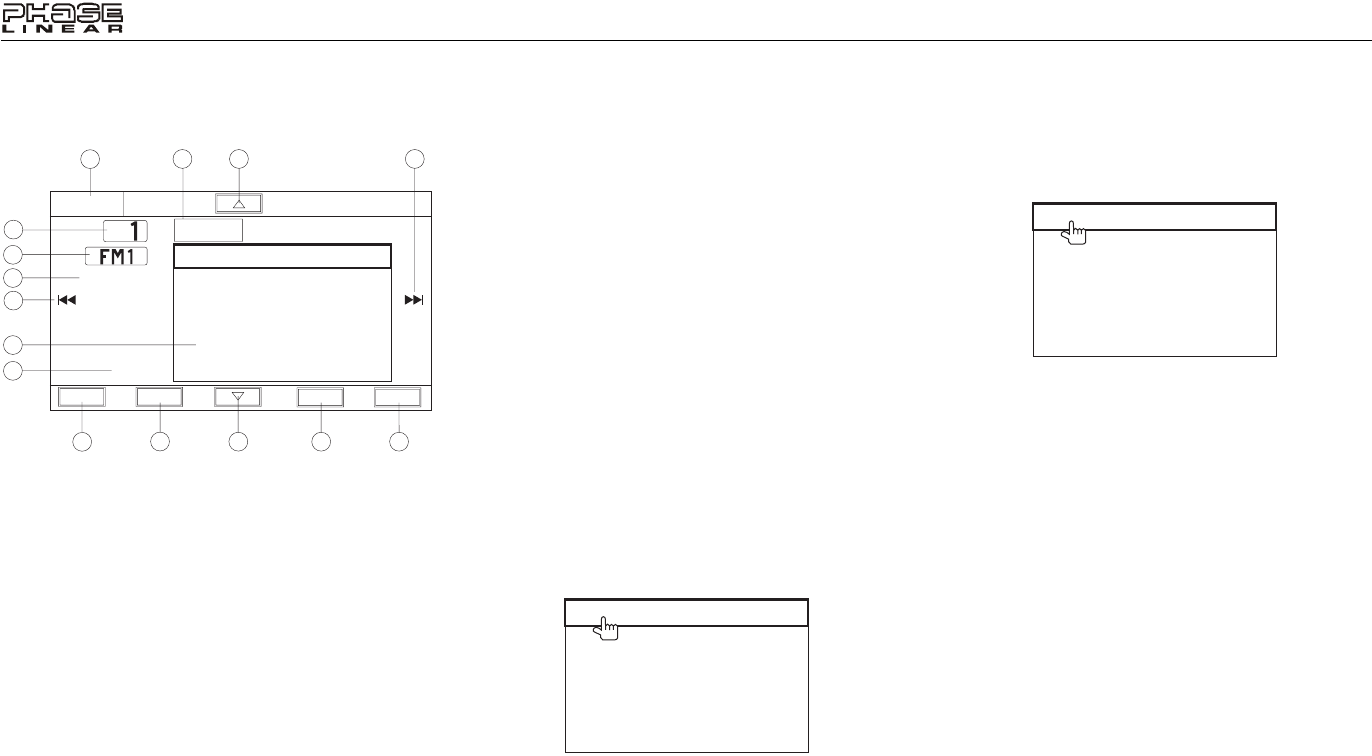
Tuner TFT Display
1. Current radio band indicator
2. Radio frequency indicator
3. Clock
4. Preset radio stations: Touch to recall preset stations
5. Current Equalizer Mode
6. |<<: Touch to seek backward
7. >>|: Touch to seek forward
8. Touch to tune forward one step
9. Touch to tune backward one step
10. AS: Touch to automatically store stations
11. PS (Preset Scan): Touch to scan all stored preset
stations, stopping for 5 seconds at each and continuing
until a station is selected
12. BAND: Touch to change between AM/FM bands
13. Touch to adjust Equalizer/Audio and Display settings
14. Touch to view the SOURCE menu and select a new
playback source
15. Current preset station indicator
Switching to Radio Tuner Source
• Touch the top left corner of the screen (SRC), or press
the MODE button (12) on the remote control, to view the
SOURCE menu. Touch “BAND”.
• Press the SRC button (2) on the front panel or remote
control (8) to switch to the AM/FM or RADIO source.
Selecting FM/AM Band
Touch the BAND button (22) on the screen or remote control
(18) to change between the following bands: FM1, FM2,
FM3, AM1, and AM2.
Seek Tuning
To seek the next higher station:
• Touch the >>| button on screen.
• Press the >>| button (18) on remote control.
To seek the next lower station:
• Touch the |<<| button on screen.
• Press the |<< button (17) on the remote control.
Manual Tuning
To increase or decrease the tuning frequency one step:
• Press the /\ or V buttons on screen.
• Press and hold the |<< or >>| button on the screen or
remote control (17, 18).
Using Preset Stations
Six numbered preset buttons store and recall stations for
each band. All six stored stations (P1-P6) for the current
band appear on the screen.
Storing a Station
1. Select a band (if needed), then select a station.
2. Press and hold the preset station position 1-6 on the
screen (4) or press and hold the number 1-6 button (27)
on the remote control.
3. The new preset station (4) appears highlighted and the
preset station indicator (15) displays the new current
preset position.
Recalling a Station
1. Select a band (if needed).
2. Touch an on-screen preset button (4) to select the
corresponding stored station.
Auto Store (AS)
To select six strong stations and store them in the current
band:
1. Select a band (if needed).
2. Touch AS button on the screen (10) for to activate the
Auto Store function.
The new stations replace stations already stored in that band.
Preset Scan (PS)
Touch the PS button (11) on screen to scan all stored preset
stations, stopping for 5 seconds at each and continuing until
a station is selected. Touch again to stop preview scan.
1
3
4
10
11
13
12
8
6
7
2
14
15
9
1 87.50
2 101.10
3 98.90
4 106.70
5 107.90
6 104.10
SRC
SEL
PS
AS
BAND
P
EQ USER
87.50
01:13
5
1 87.50
2 101.10
3 98.90
4 106.70
5 107.90
6 104.10
1 87.50
2 101.10
3 98.90
4 106.70
5 107.90
6 104.10
