


KRAMER: SIMPLE CREATIVE TECHNOLOGY
Setup and Installation
4
4 Setup and Installation
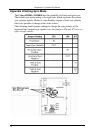
4.1 Data Mode Configuration
The serial signal is 3 wire TX, RX, GND and does not support full modem
signals. Baud rates for the S2 series are fixed at 9600. Simplex modes are
supported without jumper or other changes by simply using the TX signal only.
S2 units require no configuration.
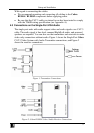
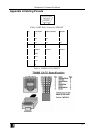
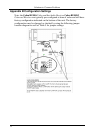
4.2 Making the Connections
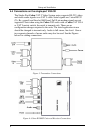
This section contains figures showing connections with the specific Cobra
R1300A / R1300S2 series models. In general, however, the connection and
setup procedure at both transmitter and receiver ends is as follows:
NOTE: all units must be the same type for all supported features to function
correctly. For example, a Cobra transmitter set for R/L summed audio must be
connected to an R1300A / R1300S2 set for R/L summed audio. Similarly, a
Cobra T2 cannot be used with an R1300A / R1300S2. Video modes may
function normally, but 4th pair options will not.
At the transmitter end (refer to the transmitter user guide):
1. Connect the source video to the Cobra Series transmitter video input port,
which is an HD15 connector labeled SOURCE IN or VIDEO IN.
2. If desired, attach a local monitor via the local monitor port to LOCAL
OUT.
3. Make your audio/serial connections via the audio connector or DB9
connector as appropriate.
4. Connect the CAT 5 cable to the transmitter.
5. Apply power on the transmitter. The LED should light and, if there is a local
monitor attached, a video image should appear on the monitor’s screen.
At the receiver end:
1. Connect the VIDEO OUT HD15 connector to the display unit and attach
any audio (AUDIO/AUX I/O) or serial connections (RS-232) depending on
the model of the Cobra CAT 5 Video System.
2. Connect the CAT 5 cable to the LINK INPUT connection. If daisy chaining
units, connect the output CAT 5 cable to the LINK OUTPUT connection.
3. Apply power. The LED should light and video should appear on the display
(make sure that the display is powered ON).
4. Adjust video levels and skew compensation.
5. Mount the R1300A / R1300S2 in a location that ensures the ventilation
holes and fan are not blocked.