


VA-8xl – Contents i
Contents
1 Introduction 1
2 Getting Started 2
2.1 Achieving the Best Performance 2
3 Overview 3
3.1 Defining the VA-8xl 8-Channel Balanced Stereo Audio Amplifier 3
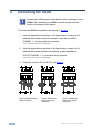
4 Connecting the VA-8xl 6
5 Operating the VA-8xl 8
5.1 Adjusting the Gain/Attenuation of the Channels 8
5.2 Storing and Recalling Setups 9
6 Controlling the VA-8xl 11
6.1 Controlling a Single VA-8xl Unit 11
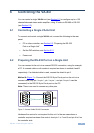
6.2 Preparing the RS-232 Port on a Single Unit 11
6.3 Configuring up to a 120 Channel Balanced Stereo Audio Amplifier 13
7 Upgrading the Flash Memory 18
7.1 Downloading from the Internet 18
7.2 Connecting the PC to the RS-232 Port 18
7.3 Upgrading Firmware 19
8 Technical Specifications 24
9 Default Communication Parameters 25
10 Kramer Protocol 2000 26
10.1 Hex Codes for Attenuation Gain Control 27
10.2 Hex Codes for Amplification Gain Control 28
10.3 Channel Number Codes 28
Figures
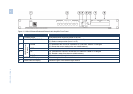
Figure 1: VA-8xl 8-Channel Balanced Stereo Audio Amplifier Front Panel 4
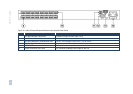
Figure 2: VA-8xl 8-Channel Balanced Stereo Audio Amplifier Rear Panel 5
Figure 3: Balanced Stereo Audio Connection 6
Figure 4: Unbalanced Stereo Audio Input Connection 6
Figure 5: Unbalanced Stereo Audio Output Connection 6
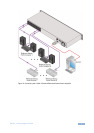
Figure 6: Connecting the VA-8xl 8-Channel Balanced Stereo Audio Amplifier 7
Figure 7: Crossed Cable RS-232 Connection 11
Figure 8: Straight Cable RS-232 Connection with a Null Modem Adapter 12
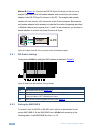
Figure 9: Rear Panel DIP-switches (Factory Default) 12
Figure 10: Configuring up to 15 VA-8xl Units 14
Figure 11: Preparing the RS-232 Connectors 15
Figure 12: An RS-485 Control Interface Setup 17
Figure 13: Splash Screen 19
Figure 14: Atmel – Flip Window 20
Figure 15: Open Configuration File Select Window 20
Figure 16: Atmel – Flip Window (RS-232 Communication) 21
Figure 17: RS-232 Window 21
Figure 18: Atmel – Flip Window (Connected) 22
Figure 19: Atmel – Flip Window (Operation Completed) 23