


70 6. NetCommand Control of an A/V Receiver (265 Series)
For assistance call 1(800) 332-2119
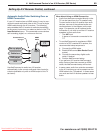
Before You Begin
To complete these steps you will need:
The remote controls for both the TV and the •
A/V receiver.
An IR emitter cable available from Mitsubishi.•
An HDMI-to-HDMI cable to connect the A/V •
receiver to the TV and cables necessary to
connect devices to the A/V receiver.
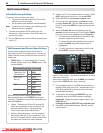
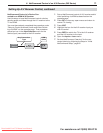
Connect the A/V receiver to the TV with an HDMI-
1.
to-HDMI cable. Do not connect the optional audio
cable at this time.
If desired, enable HDMI Control of a CEC-enabled
2.
A/V receiver. See Appendix C, “HDMI Control of
CEC Devices.”
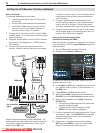
Connect your audio/video devices to the A/V
3.
receiver. Note the name of the device connected
HDMI cable
HDMI OUT
OPTICAL
AUDIO IN
ANALOG AUDIO IN
LR
High-definition
DVD player
DVD player
Cable box
VCR
Y/ VIDEO
TV
A/V receiver with
HDMI output
Any connection
types
Optional
analog or
digital audio
connection
Multiple video inputs through a single HDMI cable.. The
optional audio connection allows you to hear, through the
A/V receiver, devices connected to the TV only, e.g., an
antenna on the
ANT
input.
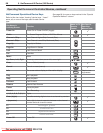
to each A/V receiver input. This information will be
needed later to set up NetCommand’s automatic
input switching.
If using an optional audio cable between the TV
4.
and A/V receiver, connect it. Set up NetCommand
control of the A/V receiver’s TV audio input when
setting up automatic switching in the next procedure.
Connect the IR emitter cable to the TV and position
5.
the IR emitter where it can send signals to the A/V
receiver. See “IR Emitters,” page 61.
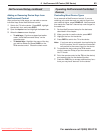
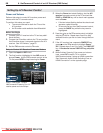
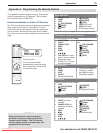
Setup to Control Automatic Audio
and Video Switching via HDMI
When this setup is complete, the “learned” A/V receiver
input will appear in the TV’s Input Selection menu as a
selectable input.
Set the
1.
TV’s remote control to TV mode.
Navigate to the
2.
Inputs > AVR menu.
To set up A/V switching over HDMI, choose your A/V
receiver input from a list.
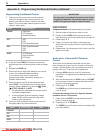
In the
3.
Inputs > AVR menu, highlight the name of the
A/V receiver input to control. In this example, it is
the DVD input.
Press
4.
ENTER
on the TV’s remote control.
While the text
5.
DVD is flashing, press and hold the
DVD INPUT
key on the A/V receiver’s remote control.
When a check appears next to
6.
DVD, release the
DVD INPUT
key.
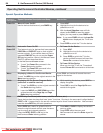
If the text stops flashing before the check mark •
appears, repeat this step.
To erase the IR code just “learned,” press •
CANCEL
while the name is highlighted.
If using an optional audio cable between the TV and
7.
A/V receiver, “learn” the
TV AUDIO OUT
key to enable
automatic switching of audio from sources con-
nected to the TV only.
If there are no more devices to set up, highlight
8.
EXIT and press
ENTER
or continue to set up addi-
tional A/V receiver audio/video sources.
Setting Up A/V Receiver Control, continued
Downloaded From TV-Manual.com Manuals