


XR-P740M, XR-P64()M, XR-PS4()M
xR-P74(), XR-P64trJ_, XR-P340
I
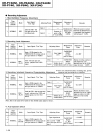
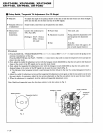
Pictup Radial/Tangential Tilt Adjustment
(For
GD
Single)
o
Objective
o
Symptom
when out
of adjustment
To
adjust the angle of the
pickup
relative
to
the disc so that
down into the disc for the best
read
out of
the RF signals.
Sound broken; some discs can be
played
but not others.
the
laser
beams
are shone straight
Measurement
Instrument
Connections
Connect the oscilloscope to
TP1,
Pinl
(RF).
[Settings]
2OmV division
20Ons7ldivision
AC mode
O
Player State
o
Adjustment Location
o
Disc
Test mode,
play
Pickup radial tilt adjustment
screw
and tangential tilt adjustment
screw
8 cm disc
[Hewever,
those
with approx.
20
min of audio signal
(music).1
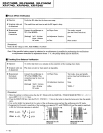
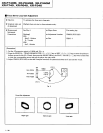
direction
Tangential
direction
Tangential
direction
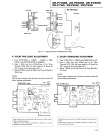
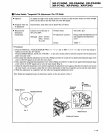
lProcedurel
l.PresstheMANUAL/TRACKSEARCHFwD>>.>>!keyorREV[<<.<<
external
circumference of the disc.
Press the DOLBY
NR key, thePLAY
/PAUSE
>/alkey
twice
in
that
order to close the
respective servos and
put
the
player
into
play
mode.
2. First, adjust the
radial tilt adjustment
screw with the hexagon wrench
(GGK1002)
so that the eye
pattern
(the
diamond
shape at the
center of the RF signal)
can be seen the
most clearly.
3.
Next, adjust the tangential
tilt adjustment
screw with the
hexagon wrench
(GGK1002)
so that the eye
pattern
(the
diamond shape at
the center of the
RF signal) can be seen the
most clearly
(Fig.
3).
X
The ball-point
type hexagonal
wrench is used because
the disc will
get
in the way
if
a
normal hexagonal wrench
is
used.
4. Adjust the radial tilt
adjustment screw
and the tangential tilt
adjustment screw again
so that the eye
pattern
can be seen
the most clearly.
As necessary, adjust the
two screws alternately
so that the eye
pattern
can be seen
the most clearly.
5. When the adjustment
is completed,
lock the radial and tangential
adjustment
screw.
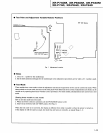
Note:
Radial and tangential
mean the directions
relative to the
disc shown in
Fig. 2.
Radial
direction
Disc
Fig.2
J"o
3
1
-34