


XR-P74()M,
XR-P640M, XR-P34()M
xF|-P7 40, XR-P640,
XR-P34()
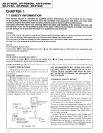
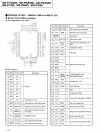
1.4 DISASSEMBLY
T
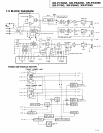
CD MECHA ASSY DIAGNOSIS AND REPLACEMENT
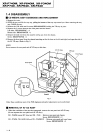
1. Remove the cover.
2. OPEN the tray and lift
the
tray
cap,
pulling
the bottom of the tray cap toward
you.
After removing the
tray
cap,
CLOSE the tray.
3. Remove the VOL knob and 2 screws
(BBZ30P080FZK)
holding the VR
assy in
place.
4. Remove the 3 screws between the front
Danel and
the chassis.
L/R sides: CBZ30P080FMC
x2
Bottom side: BBZ30P080FZK
x
1
5. Remove the lead wire from the cassette mecha assv from the chassis.
Screw: BBZ30P080FZK
x
I
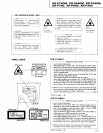
6. Remove the front
panel
from the chassis
(watching
out for the claw on the left
and right), and open the side of
the AF
CD
assy.
(Refer
to
Fig. 1)
NOTE:
Do not remove the rear
panel
and AF CD assy at this time.
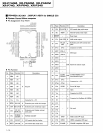
AF CD Assy
Fig. I
Under
these conditions most of the PCB diagnosis
and
parts
replacement can be
performed.
I
REMOVAL OF AF CD ASSY
1. Under the conditions of the
previous paragraph,
remove the
rear
panel
and A-F CD assy.
(Do
not separate the rear
panel
and
AF
CD assy.)
XR-P340M
(except
KU type) and XR P340
. .
Between rear
panel
and chassis.
Screw: BBZ30P080FZK
x2
XR-P740M,
740, 640M, 640 and
XR-P340IWKU
. .
Between rear
panel
and
trans frame.
Screw:
BBZ30P080FZK
x3
1-8