


12
Color Balancing
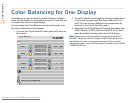
Color Balancing for Multiple Displays
Color balancing makes the individual displays in an array show
the same colors. Colors vary slightly from one display to the
next, because of slight variations in the backlights and display
panels. Color balancing can compensate for this.
When your wall is first installed, the installer will run an ACB and
then perform manual color balance adjustments.
Note:
You can manually color balance after an ACB to fine-tune
settings. These will be kept even after another ACB is performed.
Manual Color Balancing
To color balance, you only have to match whites and grays.
When you make all the displays look the same with white and
gray, all the other colors will look the same.
Caution: Do not match the colors of the displays with the Black and
White Level controls or with the video controls.
Caution: If you are color blind, even a little bit, do not color balance
your array. Have someone else color balance the wall.
1 Turn on all the displays in the array and let them warm up
for at least five minutes. The backlights must be thor-
oughly warm before you color balance.
2 On each display, open the
BACKLIGHT CONTROL menu
(
MENU > ADVANCED OPTIONS > BACKLIGHT SETTINGS).
3Set
BACKLIGHT CONTROL MODE to MANUAL.
4 Set (or confirm)
BACKLIGHT INTENSITY to 10 (100%).
5 On each display, open the
COLOR BALANCE menu by
pressing
MISC once on the remote.
6 If the array has never been color balanced, make sure you
start with the
NATIVE color temperature option on each
display. If you don’t need a specific color temperature, use
NATIVE, which is the brightest.
7 On each display, highlight
TEST PATTERN and use the left/
right arrow keys until the menu displays
WHITE.
Note:
Always use the internal Test Patterns for color balancing.
8 When all displays are white, find the least bright display in
the array. This will be the “baseline” display, and you will
not adjust it. All other displays will be adjusted to this
baseline display.
9 Choose a display next to the baseline display and adjust
its white values (red, green and blue) to make it match the
baseline display. Concentrate on the center of the dis-
plays, not the adjacent edges.
10 Continue with other adjacent displays until all the displays
have the same appearance when white. Be careful not to
change the values of displays once you are satisfied with
them.
11 When all displays look the same when showing the White
test pattern, select the Gray test pattern in all displays.
12 Choose any display as the new baseline display. It does
not need to be the baseline display you used for white.
13 Adjust gray for all the displays until they match the base-
line display. Do one display at a time. Again, match the
center part of the picture, not the edges.
14 When all displays match in gray, close all the menus. The
test pattern automatically turns off.
Downloaded From TV-Manual.com Manuals