


3
Installing the VIM
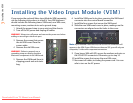
Installing the Video Input Module (VIM)
If you receive the optional Video Input Module (VIM) separately,
use the following instructions to install it. Your VIM shipment
should include the following items: VIM board, new VIM cover,
mounting screws, washers/nuts and a ground strap.
1 Attach the ground strap to your wrist and the chassis.
2 Turn off the AC power and unplug all cables.
WARNING! Always turn off power and remove the power cord when
adding or removing an electronic part.
3 Remove the screws that secure
the old VIM cover. Place the
screws aside.
4 Remove the old VIM cover.
WARNING! Failure to properly use a
grounding strap can destroy sensitive
electronic components in the VIM board.
5 Remove the VIM board from its
shipping pouch and anti-static
bag.
6 Install the VIM board in its place, pressing the VIM board
connector into the control board connector.
7 Install the four screws that secure the VIM board.
8 Slide the new VIM board cover in place, making sure the
connectors are aligned over the holes in the cover.
Note:
If you ordered a VIM with SDI, the SD/HD SDI connectors will
appear on the VIM. If your VIM does not have an SDI, you will only see
composite, S-video and component connectors.
9 If you have a VIM with SDI, secure the washers and nuts on
the SD/HD SDI connectors. Otherwise, go to step 10.
10 Install the screws that secure the new VIM cover.
11 Reconnect all cables, including the power cord. It is now
safe to turn on the AC power.
Downloaded From TV-Manual.com Manuals