


9
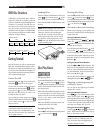
Connecting the Power Cord
AC Input
Your RDV-995 is configured at the factory for
the proper AC line voltage in the country where
you purchased it (USA: 115 volts/60Hz AC
or CE: 230 volts/50Hz AC). The AC line
configuration is noted on a decal on the back
of your unit.
After all the audio/video connections have
been made, plug the supplied power cord into
the AC INPUT receptacle on the back of the
unit. Then insert the power plug into an AC
wall outlet. The STANDBY indicator lights and
setup is complete. Note that a small amount
of power (3 watts) is always used while the
power cord is connected to the wall outlet.
Observe the following precautions:
• Do not connect or disconnect the power cord
with wet hands.
• Disconnect the power cord if you are not
going to use the unit for a long time.
• When unplugging the player from the wall
outlet, always pull the plug, not the power
cord.
• Disconnect the power cord before clean-
ing the unit.
• Disconnect the power cord before moving
the unit.
• Do not damage, alter, twist, or pull the power
cord, as this may damage the cord and
cause fire, electric shock, or other accidents.
Contact a dealer and get a new power cord
if the cord is damaged.
• Do not put anything heavy, on the unit, or
the power cord, as this may cause fire, elec-
tric shock, or other accidents.
RR-DV92 Remote Control
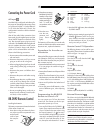
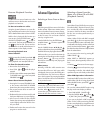
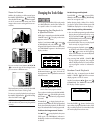
Installing the Batteries
The battery compartment is located on the back
of the remote control unit.
1 Press down on the point shown by the ar-
row at the top of the compartment cover,
and pull up the
cover to open
the compart-
ment.
2 Place the two accessory
R6P (SUM-3)/AA(15F)
batteries in the remote
control according to the
polarity markings (“+”
and “–”) inside the
compartment and on
the batteries.
3 Place the cover
over the com-
partment, and
press down
lightly.
The batteries will last about six months with
normal use. If the functions of the remote control
become erratic, replace the batteries.
Precautions for the safe use
of batteries
Observe the following precautions for the safe
use of batteries. If they are used improperly
their life will be shortened, they may burst or
their contents may leak.
• Remove the batteries from the remote control
if it is not going to be used for a long pe-
riod of time.
• Remove dead batteries and dispose of them
properly.
• Never leave dead batteries lying around,
take them apart, mix them with other refuse,
or throw them into an incinerator.
• Never touch liquid that has leaked out of
a battery.
• Do not mix new and old batteries, or bat-
teries of different types, when replacing
them.
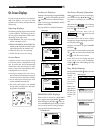
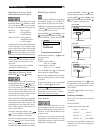
Programming the RR-DV92
Remote to Control a TV
You can operate your TV from the remote
control unit. The remote must first be pro-
grammed to operate your TV set.
1 Press and hold down the TV/VIDEO
16
button. Then enter the manufacturer code
of your TV listed in the next column using
the numeric buttons (0 - 9)
5
. Do not re-
lease TV/VIDEO. Keep holding it until the
next step is completed. (Example: To enter
code “01” press and release the “0” but-
ton, then press and release the “1” button.
2 Press the STOP
25
button, then release the
TV/VIDEO button.
3 Test the program setting by pressing the TV
POWER
15
button to see if it turns your
set on. If there is more than one code listed
for the manufacturer of your TV, try them
one by one until you succeed.
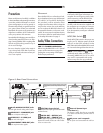
Remote Control TV Operation
The following buttons can be used for oper-
ating the TV (The numbers in brackets are those
shown on figure 1 on page 3.)
TV POWER
15
Turns the TV on or off when the SHIFT
7
button is also pressed.
TV CH
18
Changes the TV channels.
TV VOL
19
Adjusts the TV volume.
0 - 9 (Numeric Buttons)
5
Selects the TV channels (while holding down
the SHIFT button). Note: For some TVs, pressing
“+10” while holding down SHIFT functions as
the “+100”. “+10” functions as ENTER if your
TV requires pressing the ENTER after select-
ing a channel number.
TV/VIDEO
16
Switches input mode (either TV or VIDEO).
External Remote In
The 3.5mm mini-jack (labeled EXT REM IN)
receives command signals from an industry
standard infrared receiver. This feature is useful
when the unit is installed in a cabinet and the
front panel sensor is blocked. Consult your
authorized Rotel dealer for information on
external receivers and the proper wiring of
a jack to fit the mini-jack receptacle.
NOTE: The IR signals from the External
Remote In jack can be relayed to source
components using IR emitters or hardwired
connections from the IR Out jacks.
No. Manufacturer
01 JVC
02 Magnavox
03 Mitsubishi
04 Panasonic
05 RCA
06 Sharp
07 Sony
08 Toshiba
09 Zenith
10 Hitachi
11 Panasonic
12 Samsung
13 Sanyo
14 Sanyo
15 Samsung
English