


– 2 –
General
Power requirements
Where purchased Power requirements
Continental Europe and UK 220 – 230 V AC, 50/60 Hz
U.S.A and Canada 120 V AC, 60 Hz
Power consumption 18 W
Dimensions (approx.) (w/h/d) incl.projecting parts and controls
430 × 107.5 × 287 mm
(17 × 4
1
/4 × 11
3
/8 in)
Mass (approx.) 4.8 kg (10 lb 9 oz)
Supplied accessories
Audio connecting cords (2)
Optical cable (1)
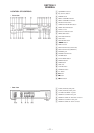
Remote commander (remote) RM-D17M (1)
R6 (size-AA) batteries (2)
Design and specifications are subject to change without notice.
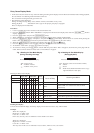
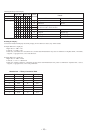
SELF-DIAGNOSIS FUNCTION
The self-diagnosis function consists of error codes for customers which are displayed automatically when errors occur, and error codes
which show the error history in the test mode during servicing. For details on how to view error codes for the customer, refer to the
following box in the instruction manual. For details on how to check error codes during servicing, refer to the following “Procedure for
using the Self-Diagnosis Function (Error History Display Mode)”.
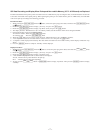
Procedure for using the Self-Diagnosis Function (Error History Display Mode).
Note: Perform the self-diagnosis function in the “error history display mode” in the test mode. The following describes the least required procedure. Be
careful not to enter other modes by mistake. If you set other modes accidentally, press the MENU/NO button to exit the mode.
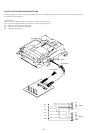
1. While pressing the [AMS] knob and p button, connect the power plug to the outlet, and release the [AMS] knob
and p button.
2. Rotate the [AMS] knob and when “[Service]” is displayed, press the [YES] button.
3. Rotate the [AMS] knob and display “ERR DP MODE”.
4. Pressing the [YES] button sets the error history mode and displays “total rec”.
5. Select the contents to be displayed or executed using the [AMS] knob.
6. Pressing the [AMS] knob will display or execute the contents selected.
7. Pressing the [AMS] knob another time returns to step 4.
8. Pressing the [MENU/NO] button displays “ERROR DP MODE” and exits the error history mode.
9. To exit the test mode, press the [REPEAT] button. The unit sets into the STANDBY state, the disc is ejected, and the test mode ends.
[]
±
≠
[]
±
≠
±
≠
±
≠
±
≠
±
≠
±≠