


17-EN
DVD (Video CD) (MOVIE MX level 1 to 2):
The dialogue portion of a video is reproduced more clearly.
(DVD MUSIC):
A DVD or Video CD contains a large quantity of data such as music
clip. MX uses this data to reproduce the sound accurately.
AUX (MX level 1):
Choose the MX mode (CMPM, MOVIE, or MUSIC) that corresponds
to the media connected.
Notes
• Each music source, such as FM radio, CD, and MP3/WMA/AAC can
have its own MX setting.
• On disks with both MP3/WMA/AAC and CD-DA, when the source
changes from “MP3/WMA/AAC to CD-DA” or “CD-DA to MP3/
WMA/AAC”, MX-mode switching may delay playback slightly.
• Setting to Non Effect sets MX mode of each music source to OFF.
• The function is inoperable when DEFEAT is set to ON.
• There is no MX mode for AM radio.
• If an audio processor with the MX function (PXA-H701, etc.) is
connected, its own MX processing is applied to the music source. Since
the processor MX settings may not match the head unit, the audio
processor needs to be adjusted. For details, refer to the Owner’s Manual
of the audio processor.
• “CMPM” is applied for MP3/WMA/AAC and iPhone/iPod.
• “SAT” is applied for XM radio and SIRIUS radio.
This setting gives you a choice of 5-band parametric, or 7-band graphic
equalizer.
Setting item: EQ Mode
Setting contents:
Parametric EQ (Initial setting) / Graphic EQ
PEQ:
5-band Parametric EQ
GEQ:
7-band Graphic EQ
You can change the unit, (cm or inch) of time correction.
Setting item: TCR Parameter
Setting contents:
cm (Initial setting) / inch
The setting of Parametric EQ/Graphic EQ and Time Correction can be
adjusted in this mode.
Adjusting the Parametric Equalizer Curve
You can modify the Equalizer settings to create a response curve more
appealing to your personal taste. To adjust the Parametric Equalizer
Curve, set the EQ Mode to Parametric EQ. For details, refer to “Setting
EQ mode” on page 17.
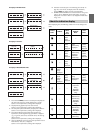
1
After selecting Parametric EQ from the Sound Field mode,
press BAND to select the band to be adjusted.
Band 1 Band 2 Band 3 Band 4 Band 5 Band 1
2
Press or to select frequency bands.
Adjustable frequency bands: 63 Hz to 17.5 kHz (in 1/3 octave
steps).
3
Turn the Rotary encoder to adjust the level.
Adjustable level: −6 to +6 dB
4
Press SOURCE to set the bandwidth (Q).
Adjustable bandwidth: 1, 2, 3, 4
5
To adjust another band, repeat steps 1 to 4 and adjust all
bands.
Note
• While adjusting the Parametric EQ, you should consider the frequency
response of the connected speakers.
Adjusting the Graphic Equalizer Curve
You can modify the equalizer settings to create a response curve more
appealing to your personal taste. To adjust the graphic equalizer curve,
set the EQ Mode to Graphic EQ. For details, refer to “Setting EQ mode”
on page 17.
1
After selecting Graphic EQ from the Sound Field mode,
press BAND to select the band to be adjusted.
Band 1 Band 2 Band 3 Band 4 Band 5 Band 6
Band 7 Band 1
2
Turn the Rotary encoder to adjust the level.
Adjustable output level: −6 to +6 dB
3
To adjust another band, repeat steps 1 and 2, and then
adjust all bands.
Adjusting the Time Correction
Before performing the following procedures, refer to “About Time
Correction” on page 39.
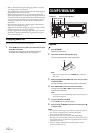
1
After selecting T.Correction from the Sound Field mode,
press BAND to select a speaker to be adjusted.
F-L
*1
F-R
*2
R-L
*3
R-R
*4
SW-L SW-R F-L
*1 Front-L (Initial setting)
*2 Front -R
*3 Rear-L
*4 Rear-R
2
Turn the Rotary encoder to adjust the distance correction
value (0.0 to 336.6cm).
L = (distance to farthest speaker) - (distance to other speakers)
3
Repeat steps 1 and 2 to set another speaker.
By setting these values to make its sound reach the listening
position at the same time as the sound of other speakers.
Setting EQ mode
Setting the Time Correction Unit (TCR
Parameter)
Sound Field Adjustment
Band-1 63 Hz~200 Hz
Band-2 160 Hz~1 kHz
Band-3 630 Hz~4 kHz
Band-4 1.6 kHz~10 kHz
Band-5 10 kHz~17.5 kHz
Band-1 80 Hz
Band-2 250 Hz
Band-3 500 Hz
Band-4 1 kHz
Band-5 4 kHz
Band-6 8 kHz
Band-7 16 kHz