


22-EN
Turning Mute Mode On/Off (INT Mute)
If a device having the interrupt feature is connected, audio will be
automatically muted whenever the interrupt signal is received from the
device.
Setting item: INT Mute
Setting contents:
ON / OFF (Initial setting)
Setting the AUX+ Setup Mode
You can input the audio of an external device, (such as a Portable audio
player) to the BLUETOOTH interface connector of this unit. A special
Conversion cable (KCE-237B) is necessary to adapt the BLUETOOTH
interface connector as an AUX IN.
A portable music device and a BLUETOOTH INTERFACE
(KCE-400BT) cannot be connected to the BLUETOOTH interface
connector at the same time.
Setting item: AUX+ Setup
Setting contents:
ON / OFF (Initial setting)
ON
*
:
Set to ON when a portable device is connected. If SOURCE is
pressed and AUX+ is selected, the sound of the portable device is
input to the unit.
* You can change the AUX+ Name display when AUX+ Setup is
set to ON. Press ENTER when AUX+ SETUP is set to ON,
and select AUX+ Name by turning the Rotary encoder, then
press ENTER. After that, turn the Rotary encoder to
select the desired AUX+ Name.
OFF:
When set to OFF, AUX+ source cannot be selected.
Setting the AUX+ Level (AUX IN GAIN)
After setting to ON in “Setting the AUX+ Setup Mode”, this setting can
be carried out.
Setting item: AUX IN GAIN
Setting contents:
Low (Initial setting) / High
Low:
Decreases the external input audio level.
High:
Increases the external input audio level.
Setting the External Digital Input
When an ALPINE Ai-NET compatible digital audio processor
(PXA-H701) and a DVD player (DVE-5207) not compatible with
Ai-NET are connected, set Digital AUX to ON to enjoy 5.1-channel
surround sound.
You can change the Digital AUX name display when Digital AUX is set
to ON. Press ENTERwhen Digital AUX is set to ON, and select
Digital AUX name by turning the Rotary encoder, then press
ENTER. After that, turn the Rotary encoder to select the desired
Digital AUX name.
Setting item: Digital AUX
Setting contents:
ON / OFF (Initial setting)
Notes
•Press SOURCE, and select the D.Aux mode, and adjust the volume,
etc.
• After input selection is completed, turn the ignition off and back on
again. Setting of the optical digital input switch is completed.
• Depending on the connected audio processor, DVD player sound may
continue to be output, even though the source is changed to another
one. If this occurs, set the DVD player’s power to OFF.
Setting the AUX Mode (V-Link)
You can input TV/video sound by connecting an optional Ai-NET/RCA
Interface cable (KCA-121B) or Versatile Link Terminal (KCA-410C) to
this component.
You can change the AUX name display when AUX IN is set to ON. Press
ENTER when AUX IN is set to ON, and select AUX Name by
turning the Rotary encoder, and then press ENTER.
After that, turn the Rotary encoder to select the desired AUX name. If
the KCA-410C is connected, it is possible to select two AUX names.
Setting item: AUX IN
Setting contents:
ON / OFF (Initial setting)
Note
• Via KCA-410C, up to 2 external devices with RCA output can be
connected. In this case, press SOURCE to select AUX mode and
then press BAND to select your desired device.
Changer Name Setting
This setting is used when the head unit is connected to the USB Adapter
for MP3 (KCA-620M). You can set the name to be displayed on the unit
depending on the device to which the USB Adapter for MP3
(KCA-620M) is connected.
Setting item: Changer Name
Setting contents:
Changer (Initial setting) / USB / Portable
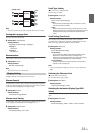
Connecting to an External Amplifier
When an external amplifier is connected, sound quality can be
improved by stopping the power supply of the built-in amplifier.
Setting item: Power IC
Setting contents:
ON (Initial setting) / OFF
Power IC ON :
The speakers are driven by the built-in amplifier.
Power IC OFF :
Use this mode when the line output of this unit is used to drive an
external amplifier. In this setting, the head unit’s internal amplifier
is turned OFF and can not drive speakers.
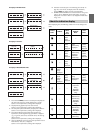
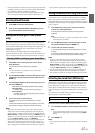
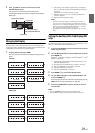
Speakers
SPEAKER
RIGHT FRONT
Front
right
SPEAKER
RIGHT REAR
Rear
right
SPEAKER
LEFT REAR
Rear
left
SPEAKER
LEFT FRONT
Front
left
POWER IC ON: