


10-EN
Recalling Preset RDS Stations
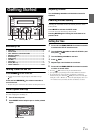
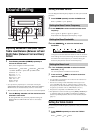
1
Press FUNC./SETUP so that the indicator
lights up.
2
Press 1 /AF to activate the RDS mode.
3
Press FUNC./SETUP to activate the normal mode.
The indicator goes out.
4
Make sure that the indicator light goes out, then
press the preset button in which your desired RDS
station is preset.
If the preset station’s signal is weak, the unit automatically
searches and tunes to a stronger station in the AF
(Alternative Frequencies) list.
5
If the preset station and the stations in the AF list
cannot be received:
When the PI SEEK setting is on (refer to “PI SEEK Setting”
on page 10), the unit searches again for a station in the PI
(Programme Identification) list.
If there are still no stations receivable in the area, the unit
displays the frequency of the preset station and the preset
number disappears.
If the signal level of the Regional (Local) station being tuned
becomes too weak to receive, press the same preset button
to tune in a Regional station in other district.
• For presetting the RDS stations, refer to the Radio Operation section.
The RDS stations can be preset in the F1, F2 and F3 bands only.
• Operate the unit while the indicator lights up. If no operation is
performed for 10 seconds, the indicator goes out.
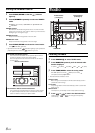
Receiving RDS Regional (Local)
Stations
1
Press and hold FUNC./SETUP for at least 2
seconds to activate the SETUP mode.
2
Turn the Rotary encoder to select the REGIONAL
mode, and then press
/ENT.
3
Turn the Rotary encoder to select ON or OFF.
In the OFF mode, the unit automatically keeps receiving the
related local RDS station.
4
Press and hold FUNC./SETUP for at least
2 seconds to return to normal mode.
• Press /ESC to return to the previous mode.
• If no operation is performed for 60 seconds, the unit will return to
normal mode automatically.
PI SEEK Setting
1
Press and hold FUNC./SETUP for at least 2
seconds to activate the SETUP mode.
2
Turn the Rotary encoder to select the PI SEEK
mode, and then press
/ENT.
3
Turn the Rotary encoder to select ON or OFF.
4
Press and hold FUNC./SETUP for at least 2
seconds to return to normal mode.
• Press /ESC to return to the previous mode.
• If no operation is performed for 60 seconds, the unit will return to
normal mode automatically.
Setting the Time to automatically Adjust
When you set to ON, the time is automatically adjusted by RDS data.
1
Press and hold FUNC./SETUP for at least 2
seconds to activate the SETUP mode.
2
Turn the Rotary encoder to select AUTO CLOCK,
and then press
/ENT.
3
Turn the Rotary encoder to select ON or OFF.
4
Press and hold FUNC./SETUP for at least 2
seconds to return to normal mode.
• Press /ESC to return to the previous mode.
• If no operation is performed for 60 seconds in the SETUP mode, the
setting mode is cancelled.
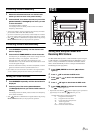
Receiving Traffic Information
1
Press and hold BAND/TA for at least 2 seconds so
that the “TA” indicator lights up.
2
Press or to select your desired traffic
information station.
When a traffic information station is tuned in, the “TP”
indicator lights up.
Traffic information is heard only when it is being broadcast.
If traffic information is not being broadcast, the unit is set in
the standby mode. When a traffic information broadcast
begins, the unit automatically receives it and the display
shows “TRF-INFO” for 5 seconds.
When the traffic information broadcast is over, the unit will
automatically set in the standby mode.
• If you do not want to listen to the traffic information being received,
lightly press BAND/TA to skip that traffic information message. The
TA mode will remain in the ON position to receive the next traffic
information message.
• If the volume level is changed while receiving traffic information, the
changed volume level will be memorized. When traffic information is
received next time, the volume level will be automatically adjusted to
the level memorized.
• In the TA mode, the SEEK tuning selects only the TP stations.